Service Features
Pinning the sender name on the sending page
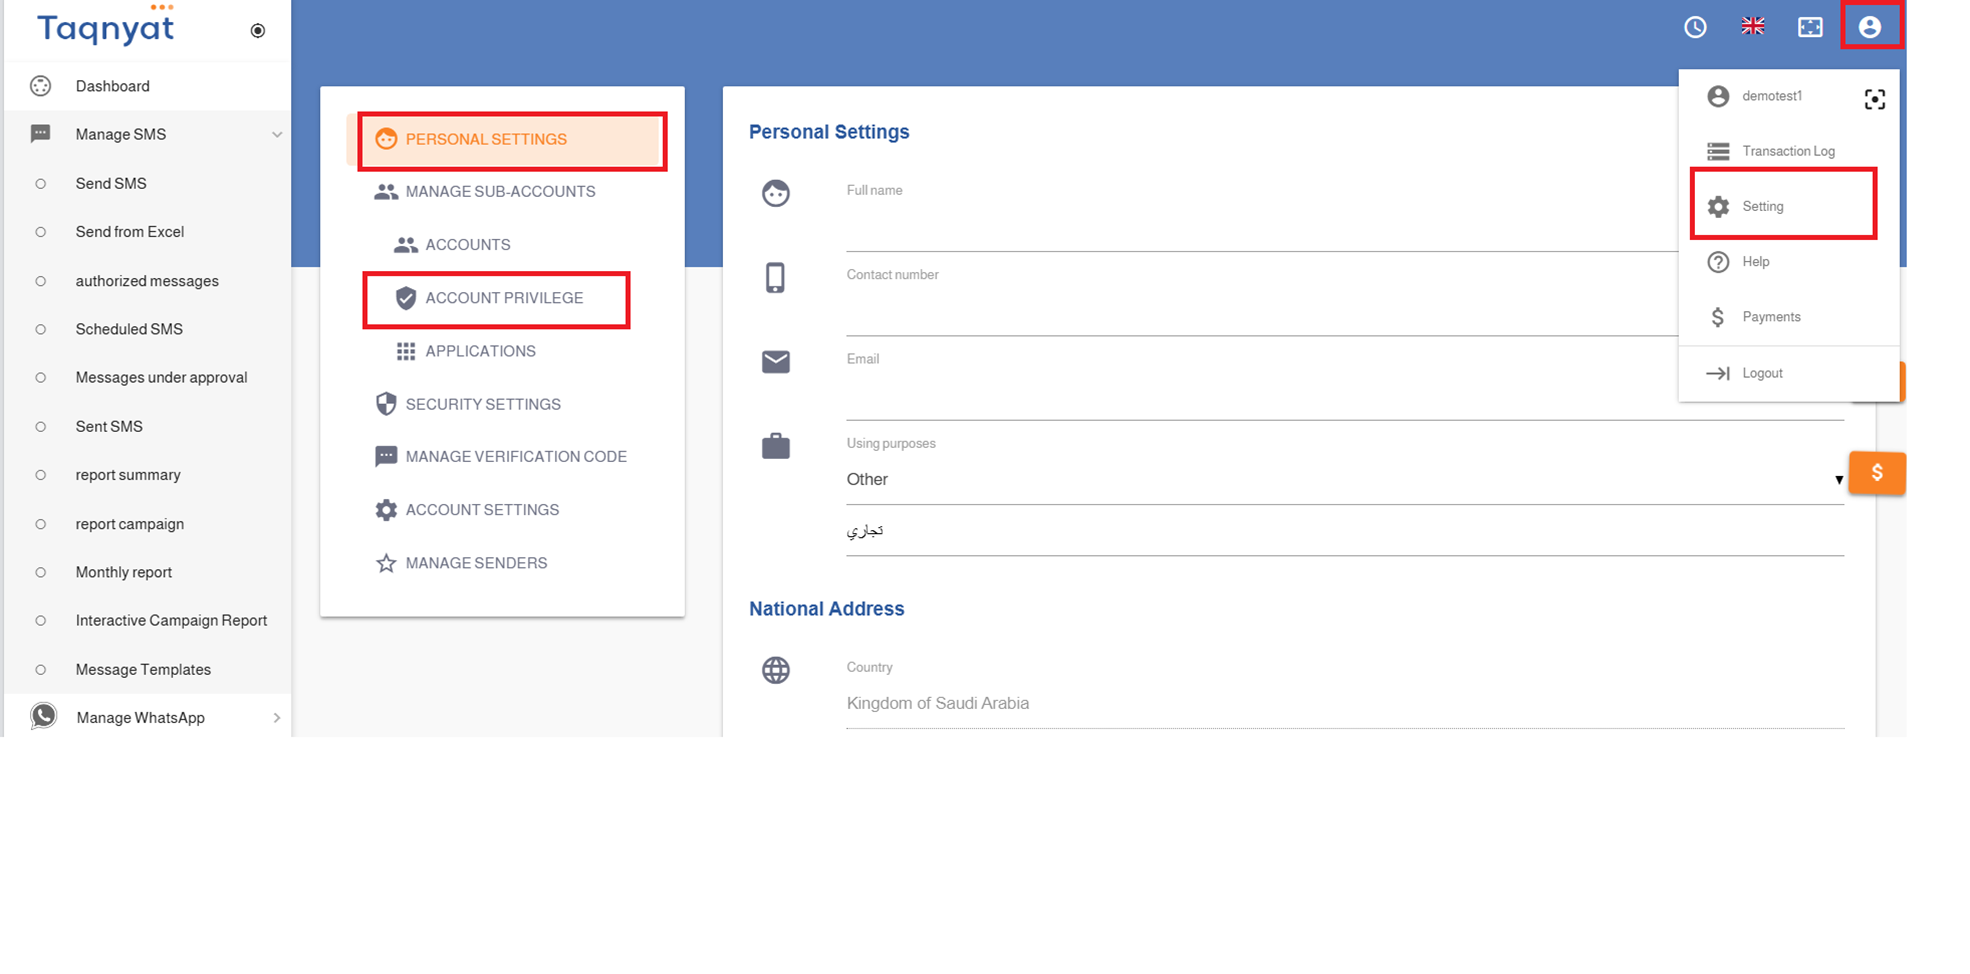
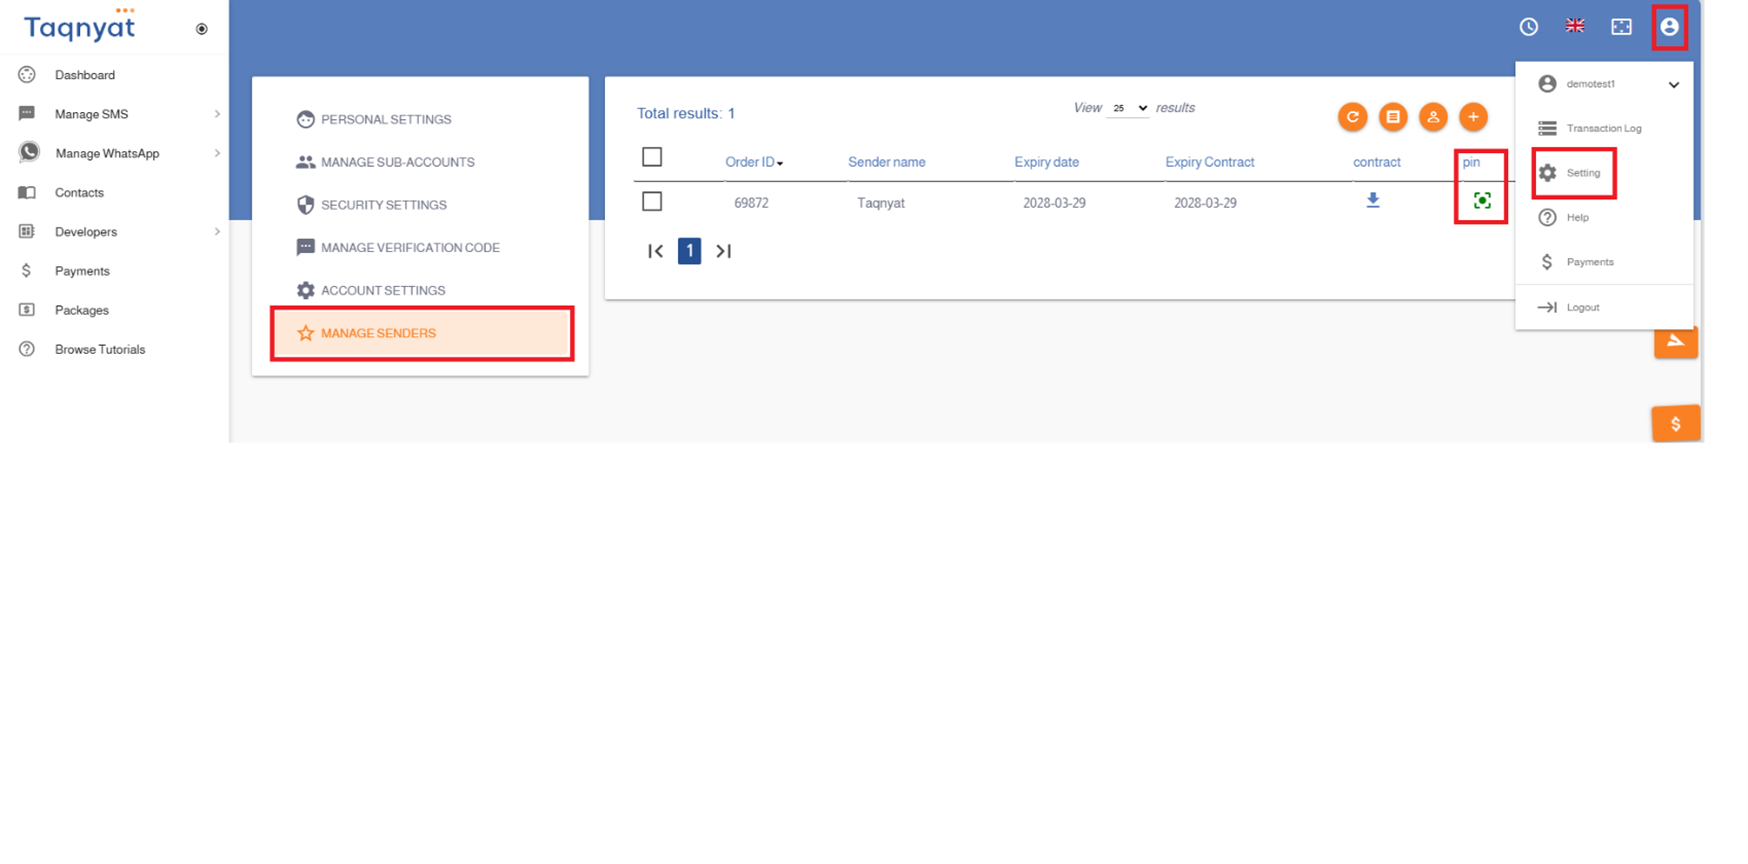
You can pin the sender name on the sending page by following these steps:
- Go to the Settings option within your account.
- Select "Manage Sender Name."
- Choose the name you want to pin on the sending page, then click the pin icon to complete the process.
Reference Image:
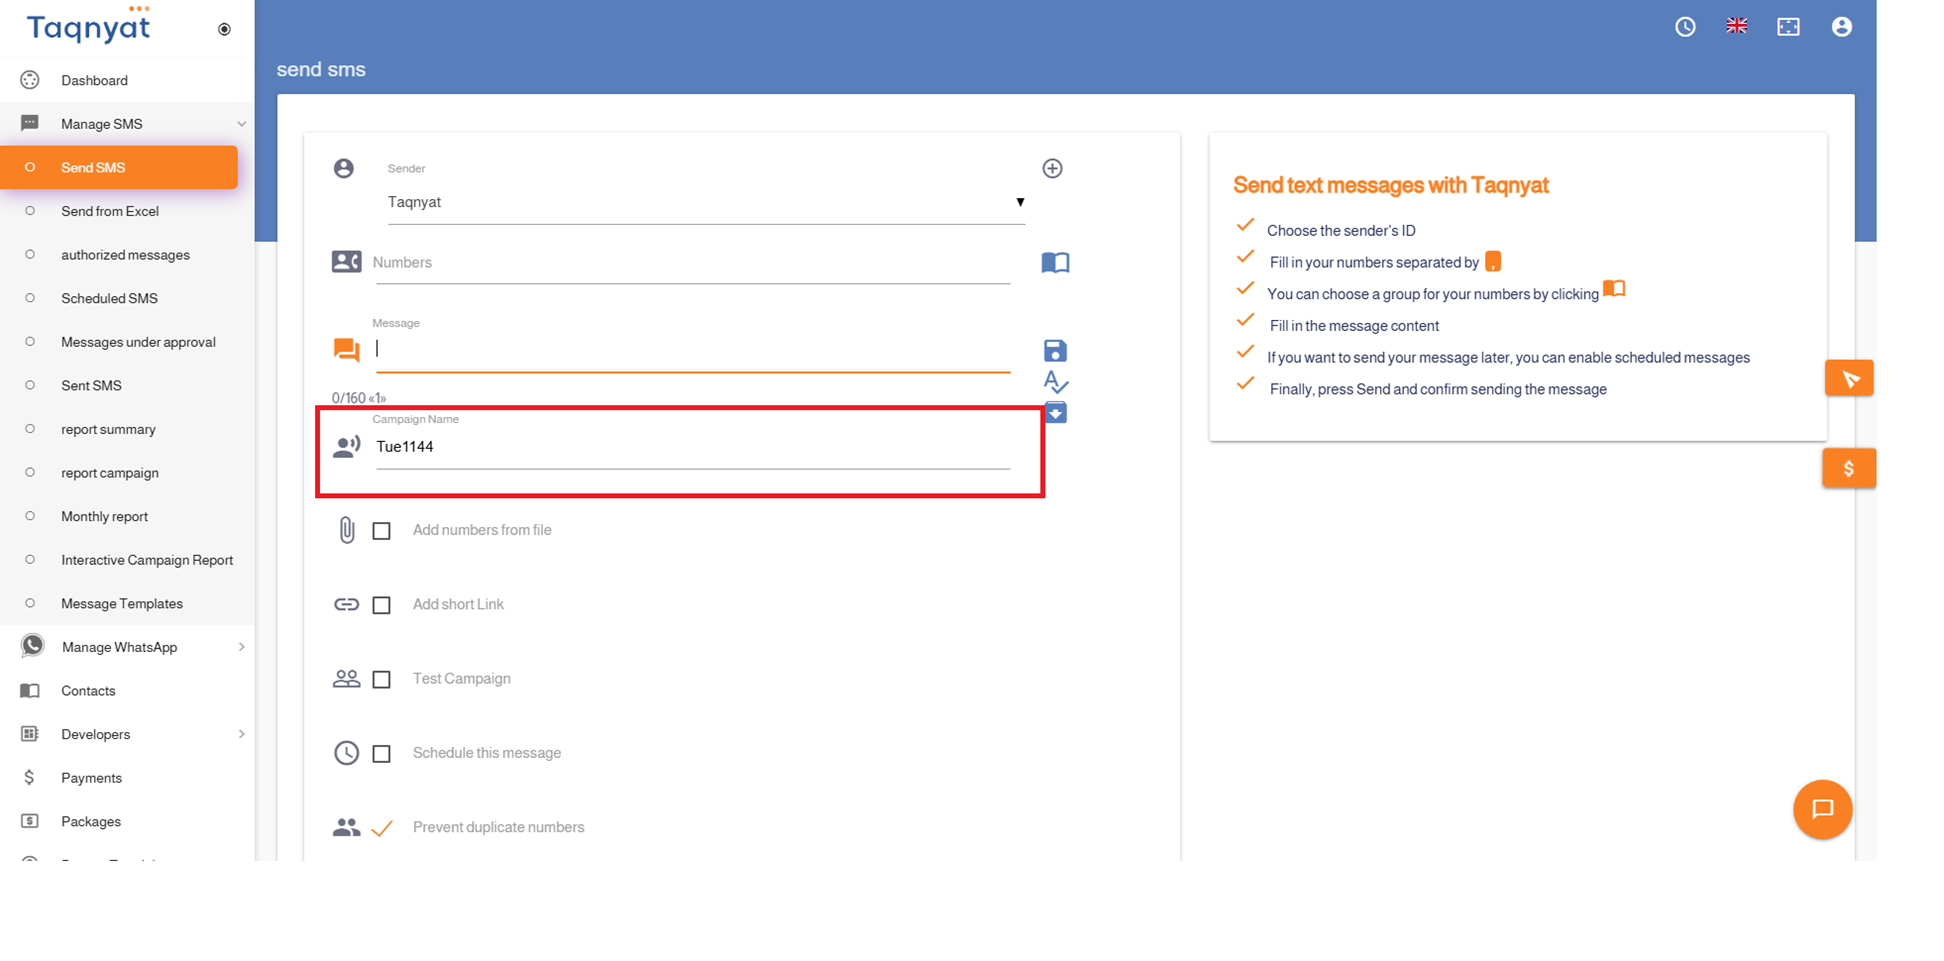
Campaign name
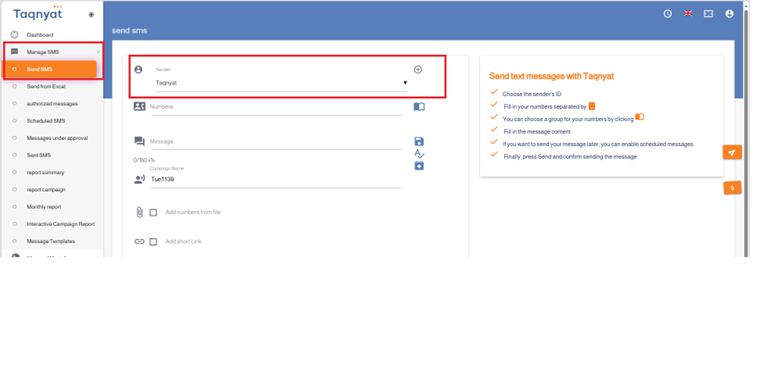
The Campaign Name feature allows you to name each campaign you send, enabling you to distinguish between different campaigns by giving them custom names. You can then use these names later to review detailed reports and information about the performance of each campaign based on its name.
- Campaign names must be in English letters and may include numbers without spaces.
- You can add an unlimited number of campaign names.
- Campaign names cannot be changed after sending
- There are no additional fees for this service.
Reference Image:
Campaign Test
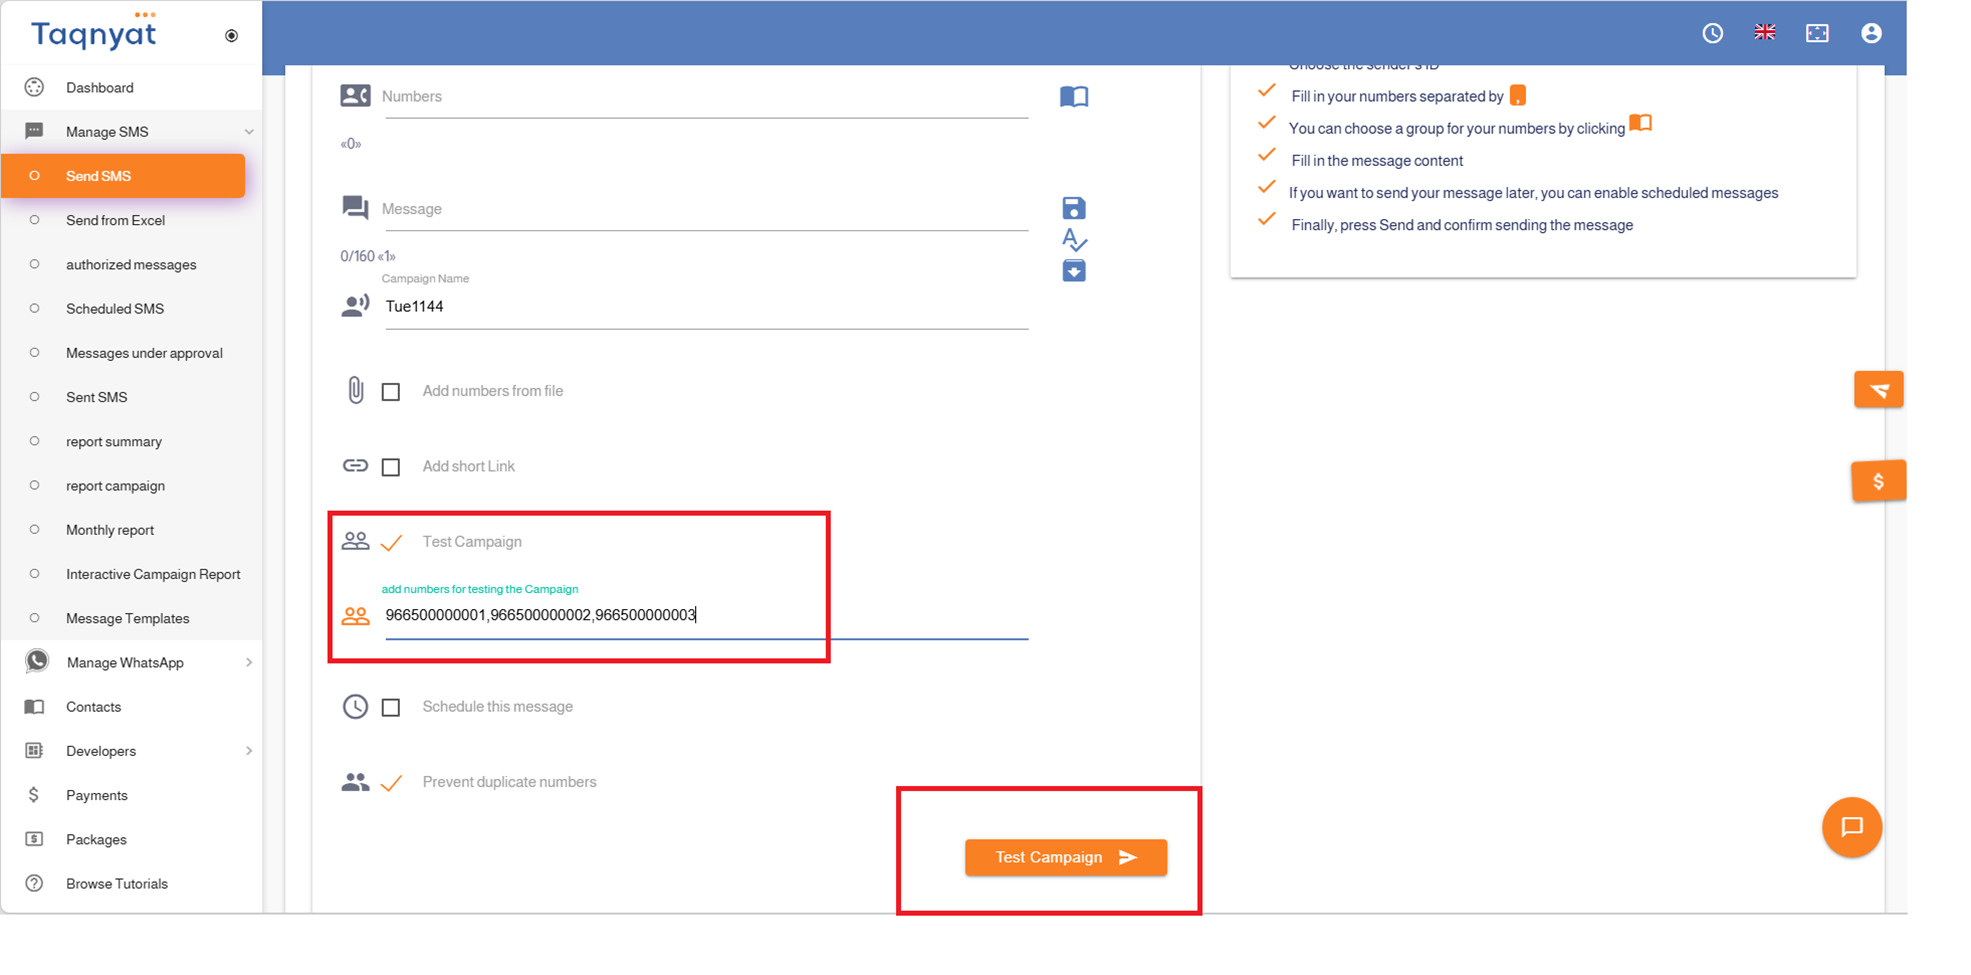
The "Campaign Test" feature is used when you want to send a campaign to a large group of numbers, allowing you to send a trial message to a single specified number before launching the full campaign. This lets you verify how the message appears on mobile phones.
Advantages of the "Campaign Test" feature:
- Free of charge
- Ability to test only one number at a time initially
- You can repeat the process and run tests on one number each time
- During testing, the data entered on the sending page and prepared for the campaign remains unaffected
To activate the "Campaign Test" feature, follow these steps:
- Enable the "Campaign Test" option
- Enter the mobile number you want to test the message on.
- Click on "Campaign Test" and confirm the sending process.
- After verifying the message content and reviewing the results, you can disable the "Campaign Test" option to send the campaign fully.
Reference Image:
Short link
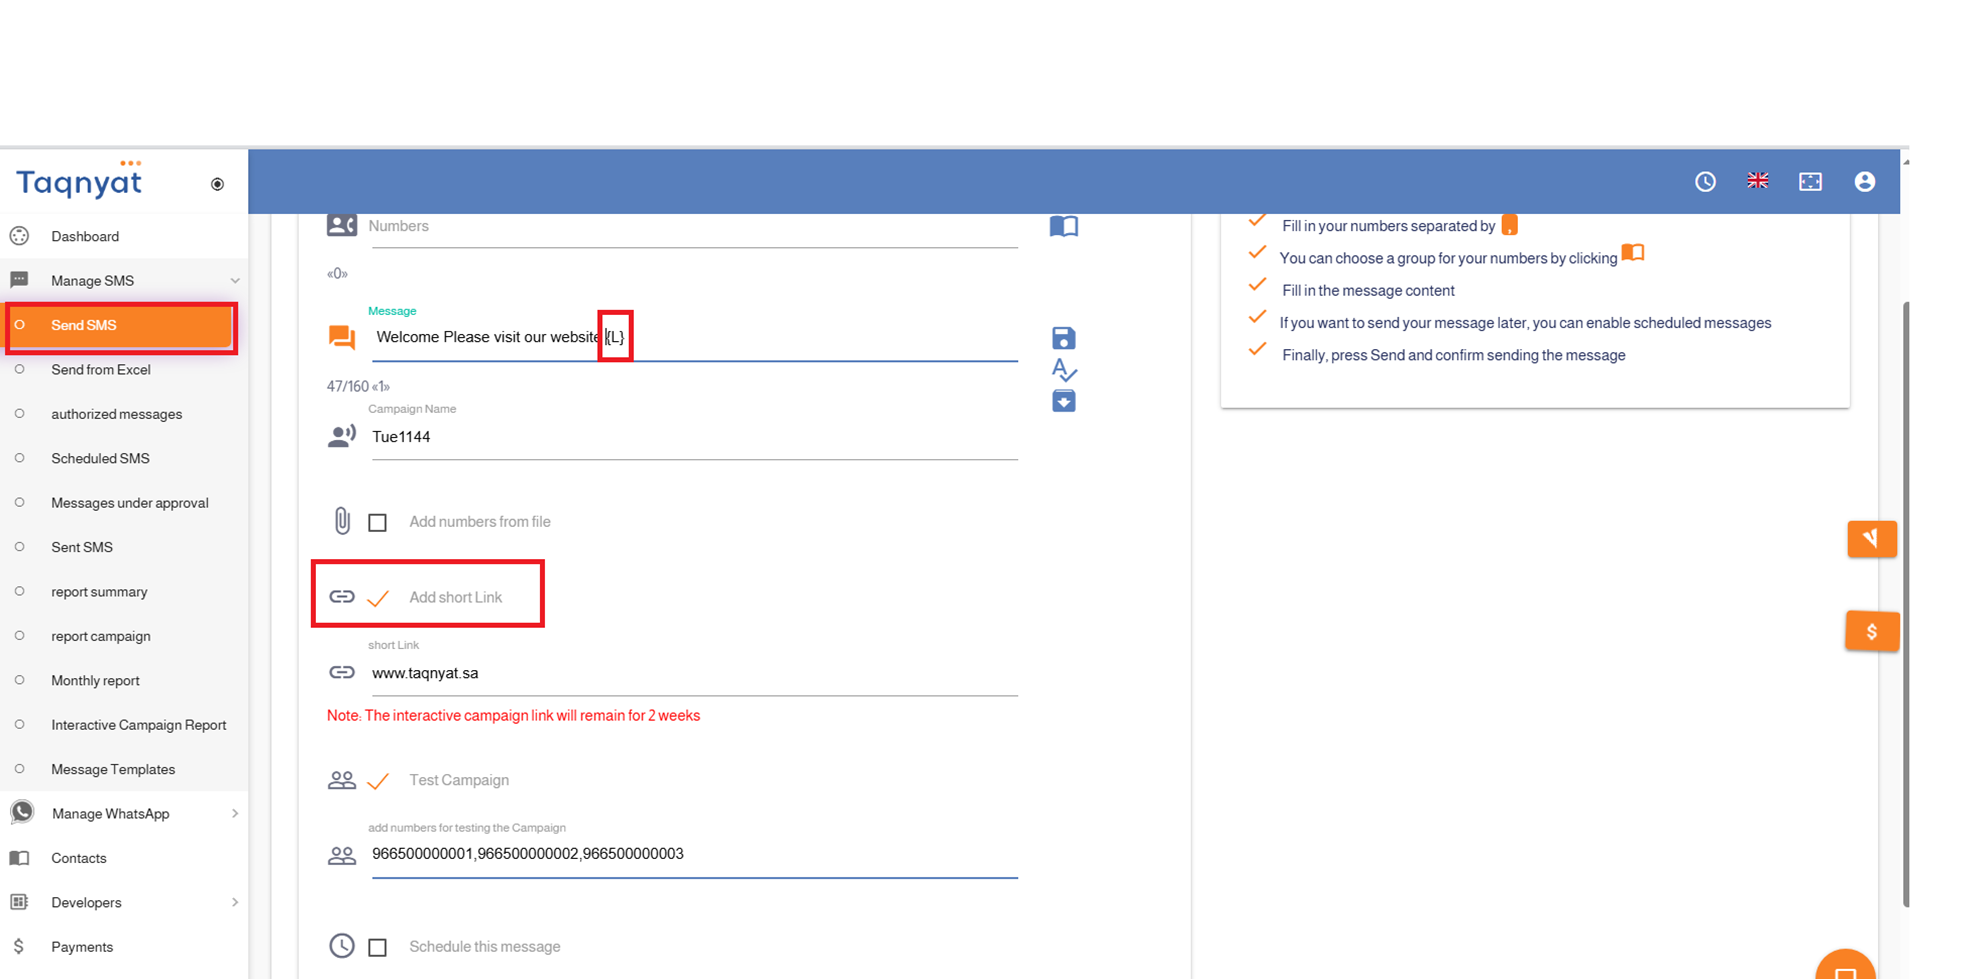
The Short Link feature allows you to create a shortened link for your website and include it in the message text instead of the original website URL.
Features of the "Short Link Service":
- Free of charge.
- Reduces the length of the message.
- The short link is generated with our domain name, such as "tqn.at".
- Ability to obtain statistical reports showing who clicked the short link through the "Interactive Campaign Report" option.
- The validity of the short link lasts for only two weeks.
- The short link can be shared via social media platforms
To activate the short link, follow these steps:
- Select the "Add Short Link" option at the place in the message text where you want to insert the link.
- Enter your website URL in the designated box below the "Add Short Link" option.
Reference Image:
Prevent duplicate numbers
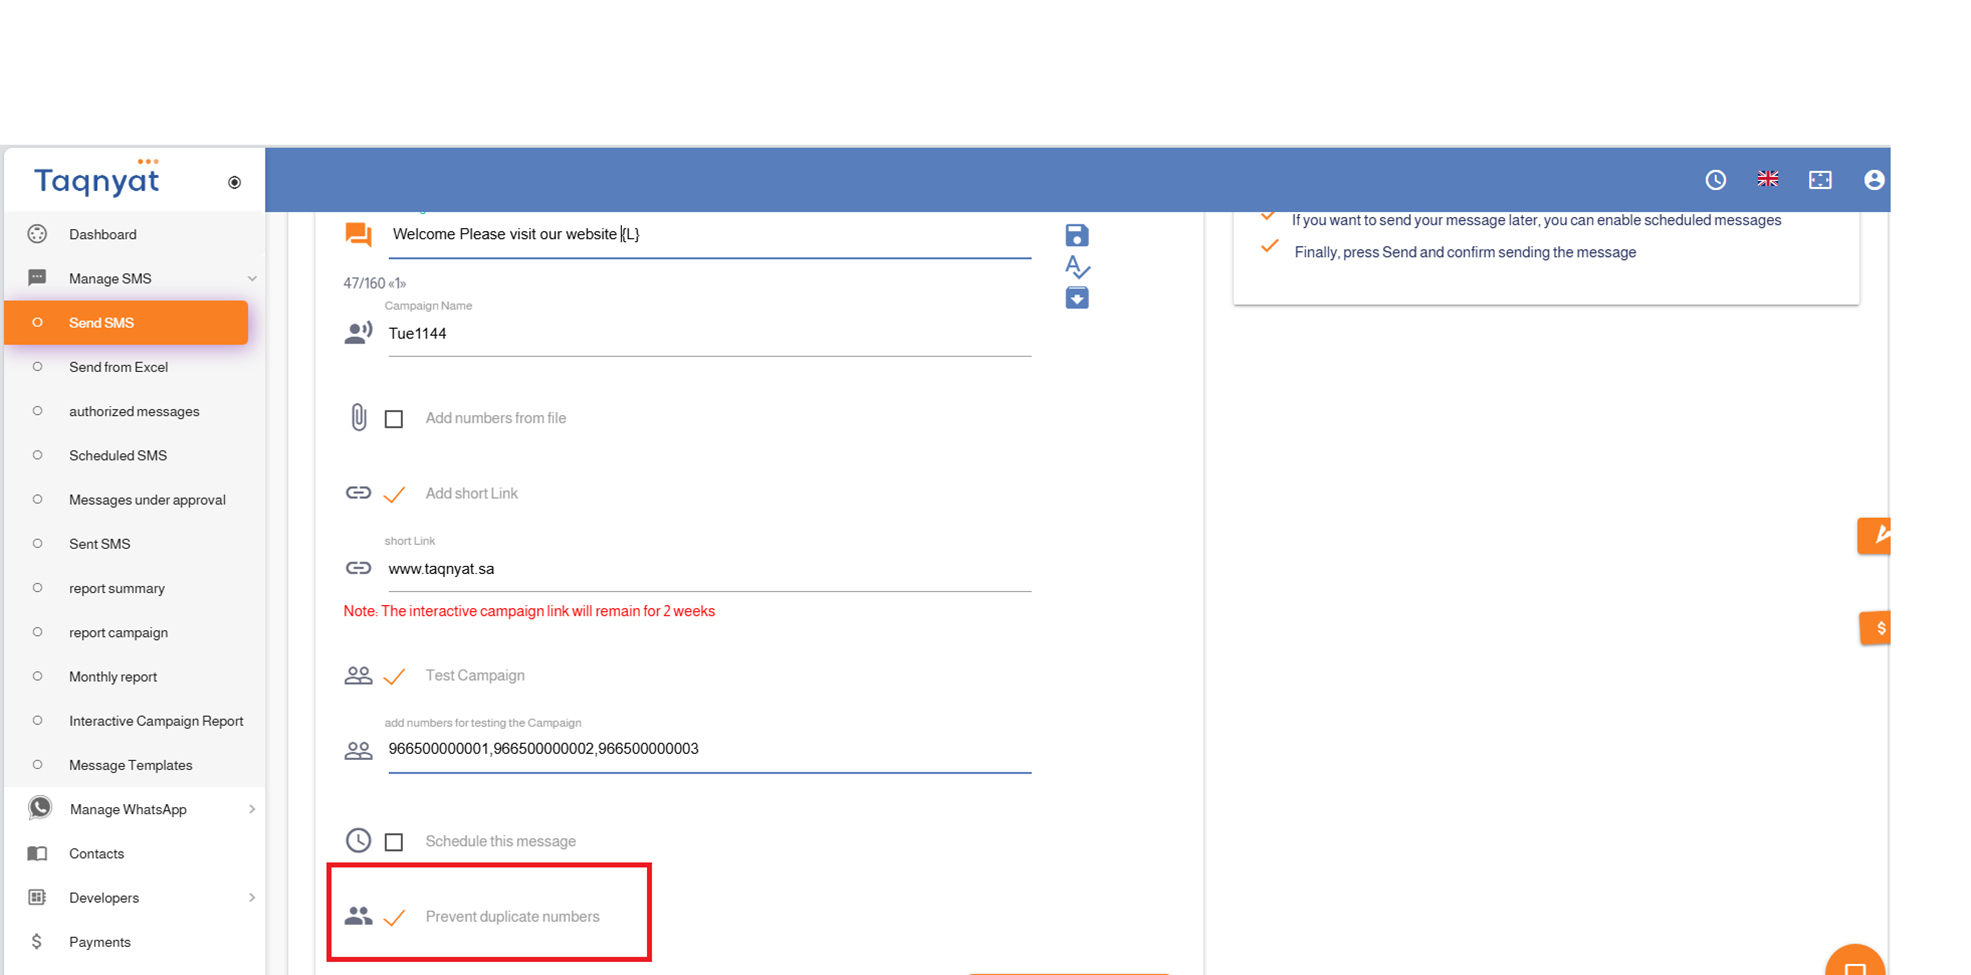
The "Duplicate Number Prevention" feature is automatically enabled and prevents sending more than one message to the same number by removing duplicate numbers before the sending process.
Advantages of the Duplicate Number Prevention feature:
- Free of charge.
- Automatically removes duplicate numbers before sending.
- Simply write your message text in the message field.
- You have the option to disable this feature if you wish to send messages to duplicate numbers.
This feature is enabled by default in the system, but you can deactivate it if needed.
Reference Image:
Interactive Campaign
The "Interactive Campaign" feature allows you to generate a shortened link to your website and include it in your message text instead of the original website URL. Each recipient will receive a unique, personalized link.
Advantages of the Interactive Campaign feature:
- Free of charge
- Shortens the message length
- The shortened link is generated using our domain, such as "tqn.at"
- Enables you to view reports showing which numbers opened the shortened link via the "Interactive Campaign Report" option
- The shortened link remains valid for two weeks
- The shortened link can be shared via social media
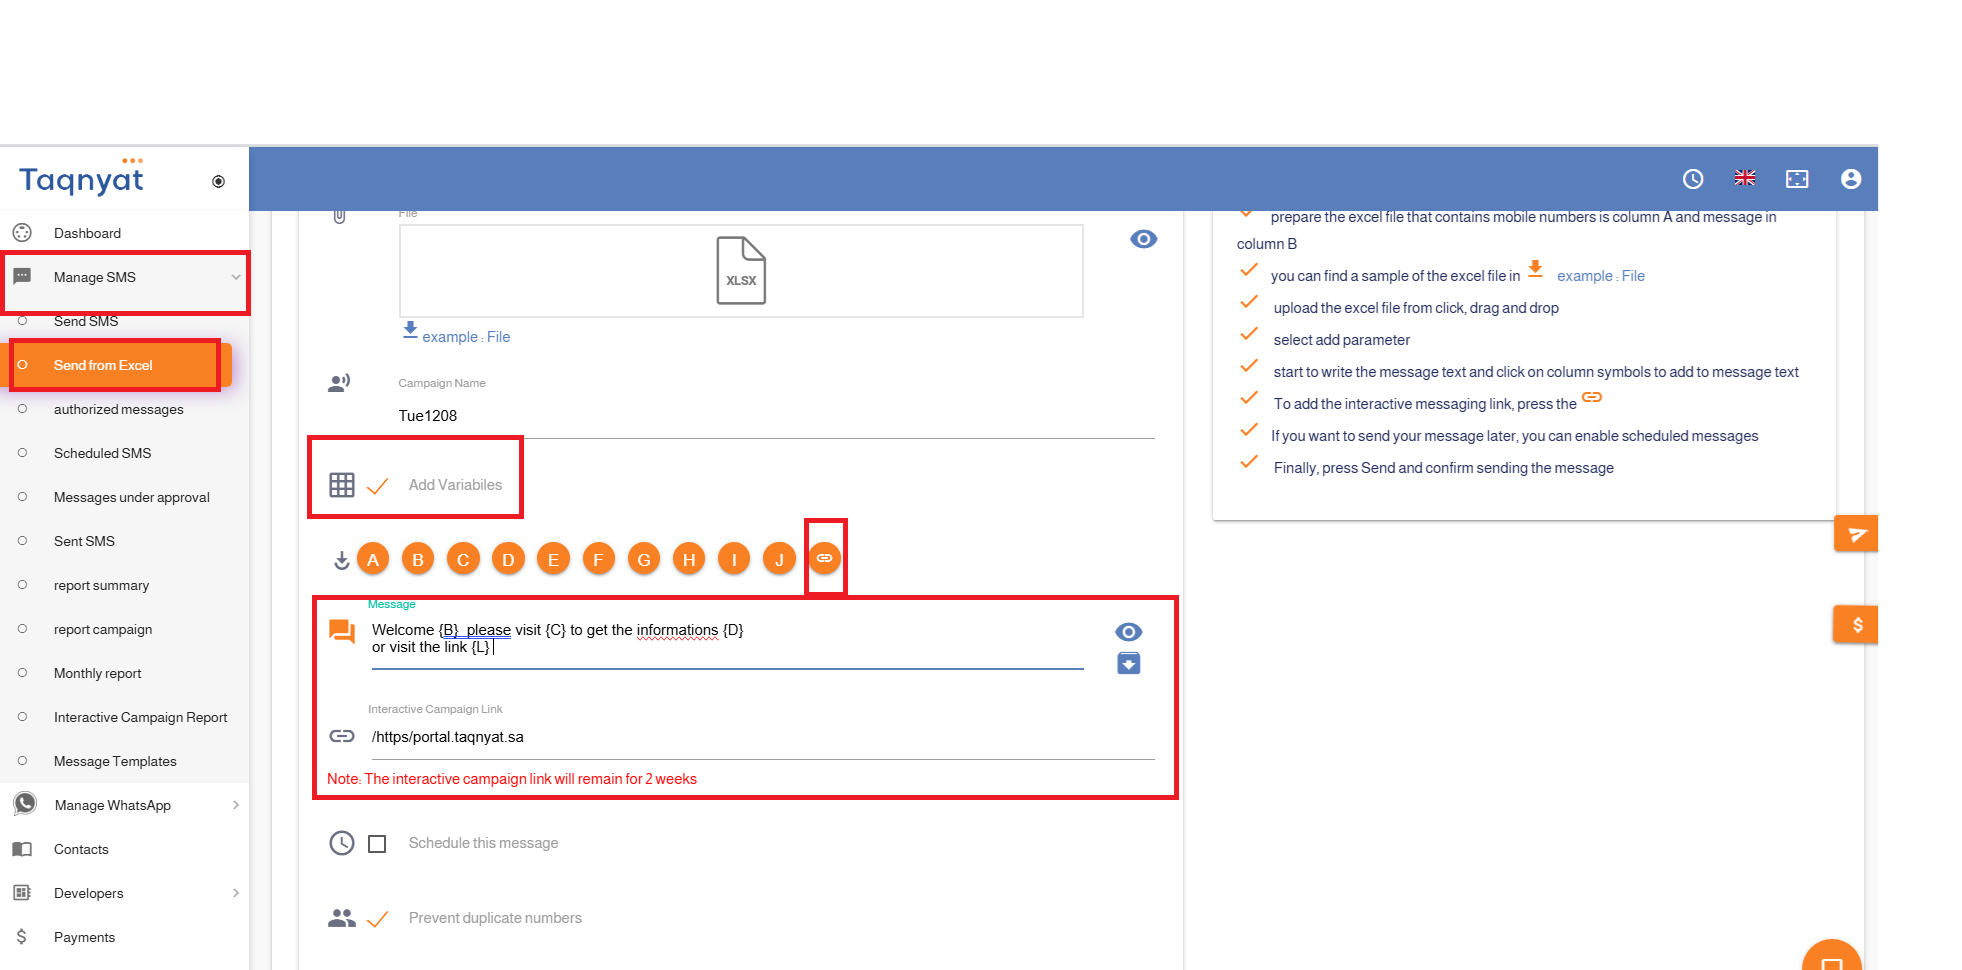
To activate the interactive link, follow these steps:
- Go to SMS Management
- Select Send from Excel File
- Choose the Sender Name
- Upload the Excel File
- Enable Add Variable
- Click on the link icon at the position where you want to insert the link in the message text
- Enter your website URL in the Interactive Campaign Link field
- Preview the message by clicking the eye icon to the left of the message text field
- Click Send
- Review the number of recipients and total messages to be sent, then confirm the sending process
Reference Image:
Sending Templates
You can store a message text using the "Send Templates" feature, allowing you to resend it directly at any time without the need to rewrite the text for each campaign.
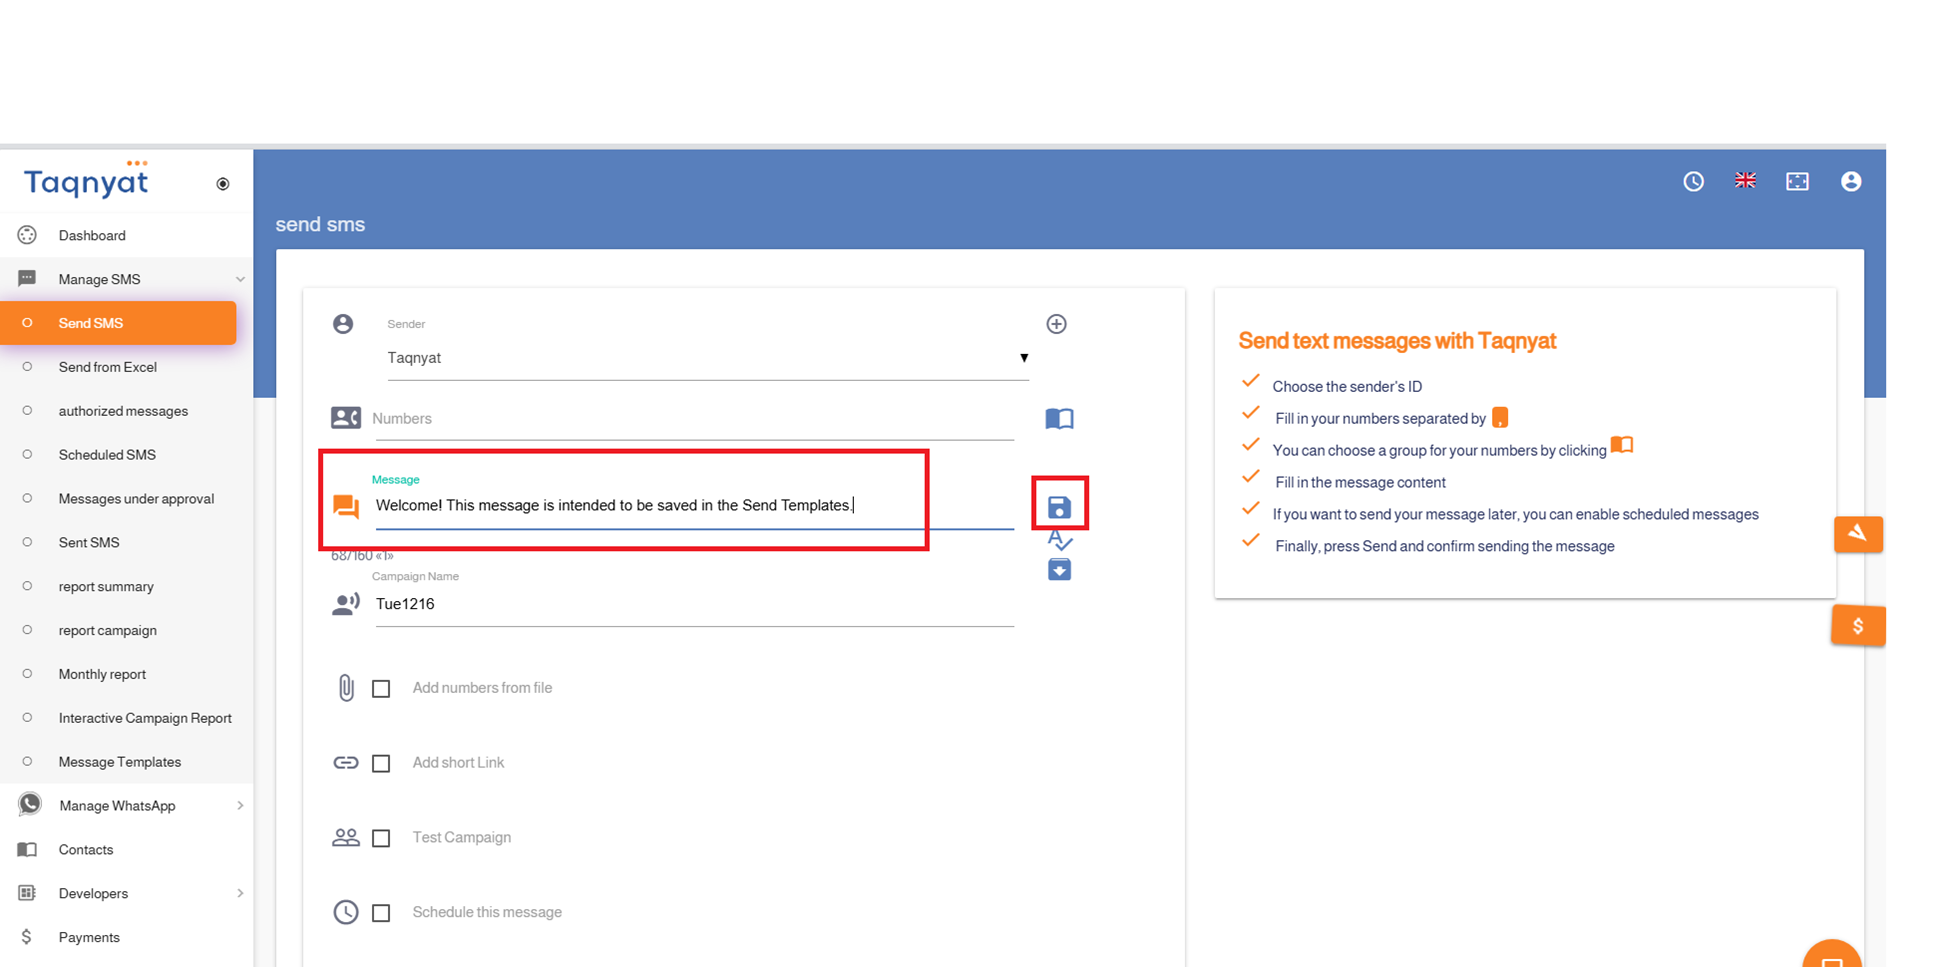
To save a message as a send template, follow these steps:
- Log in to your account via https://portal.taqnyat.sa/
- Go to "SMS Management"
- Select "Send SMS"
- Write your message in the message text field
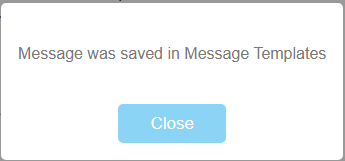
- Click the "Save Message" icon on the left side of the message field
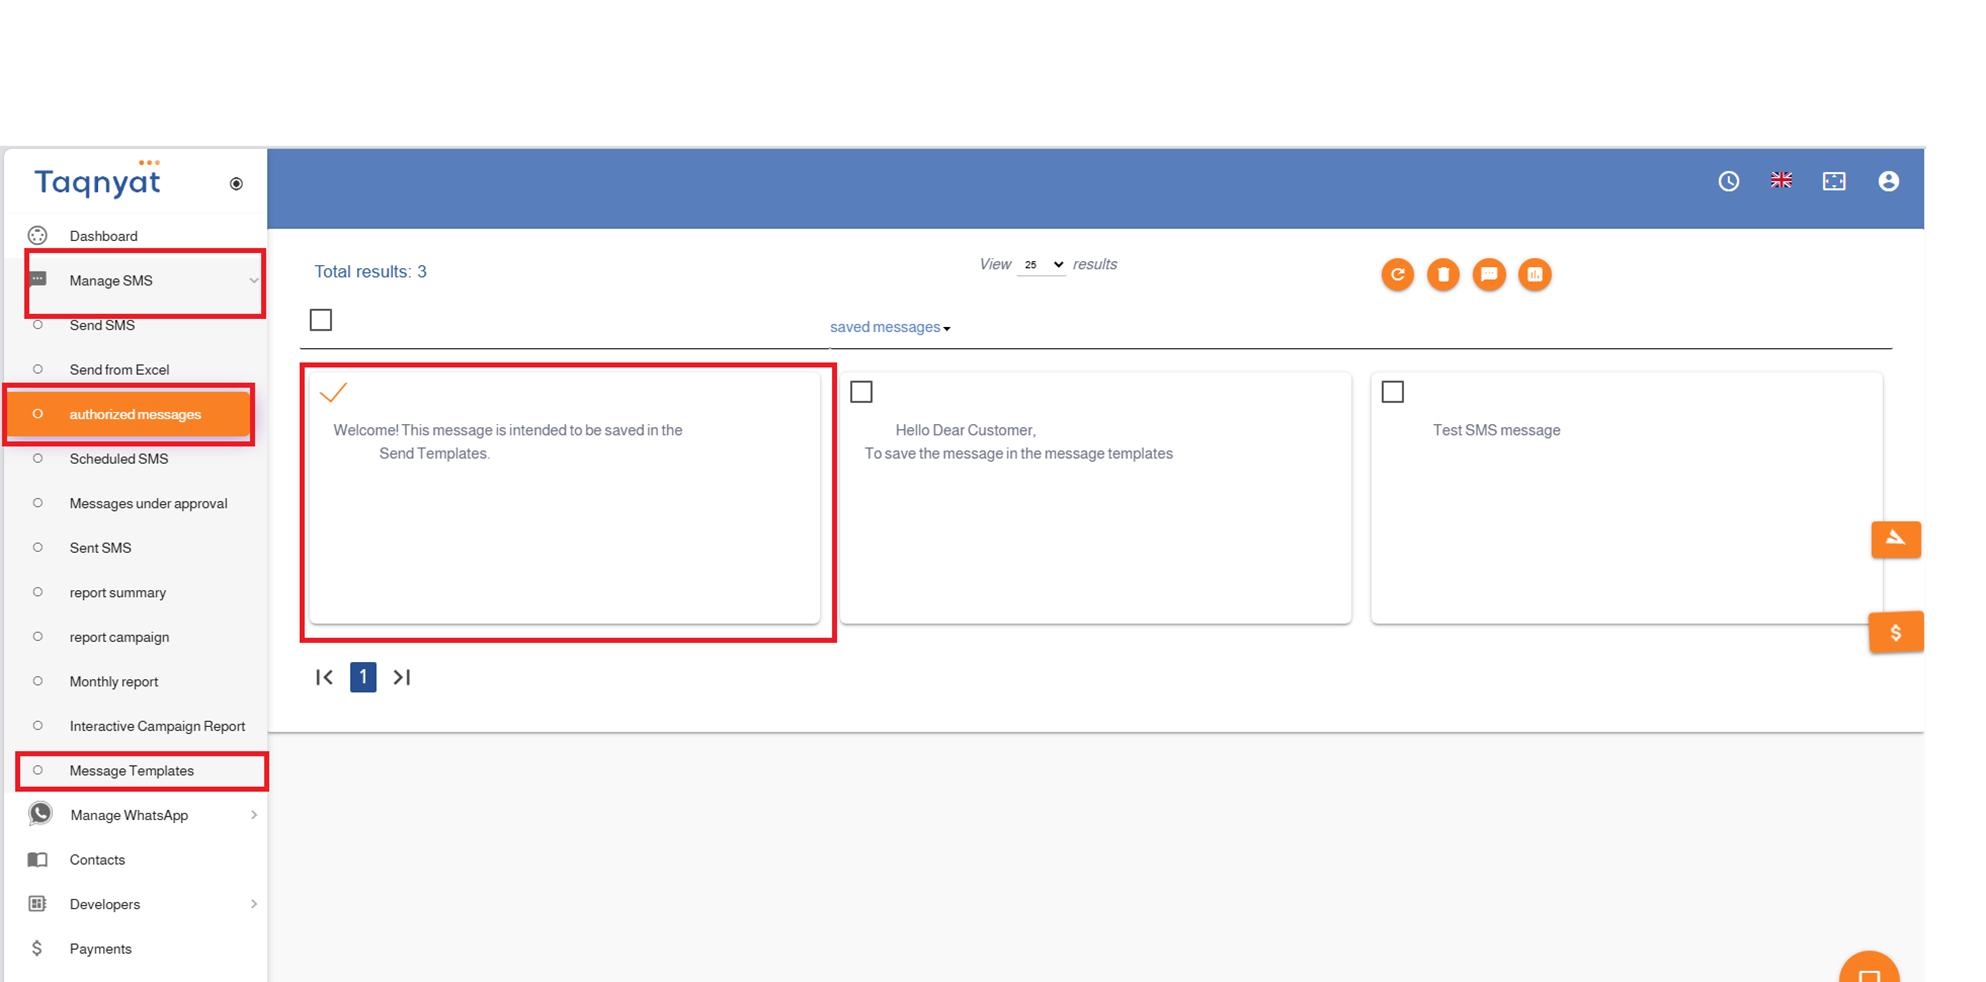
To send a message using a previously saved template:
- Go to "SMS Management"
- Select "Send Templates"
- Choose the template you wish to use
- Click the "Send" icon to proceed with sending the message
Advantages of the Send Templates feature:
- Free of charge
- Unlimited storage of message templates
- No expiration date for saved templates
Reference Image:
Messages Under Approval
The " Messages Under Approval" feature allows the main account to control the messages sent from sub-accounts. Messages initiated from sub-accounts require the main account's approval before being sent.
Features of the " Messages Under Approval " Service:
- Free of charge: No additional fees are required.
- Controlled sending: Messages from sub-accounts will not be sent without main account approval.
- Rejection option: The main account can reject messages and specify the reason for rejection.
- Editable messages: Rejected messages can be edited and re-submitted for approval.
- Deletion capability: Sub-accounts can delete messages pending approval.
- Approved templates: The main account can add approved message templates that sub-accounts can send without approval.
- Notifications: The main account will receive alerts for any messages pending approval.
Reference Image:
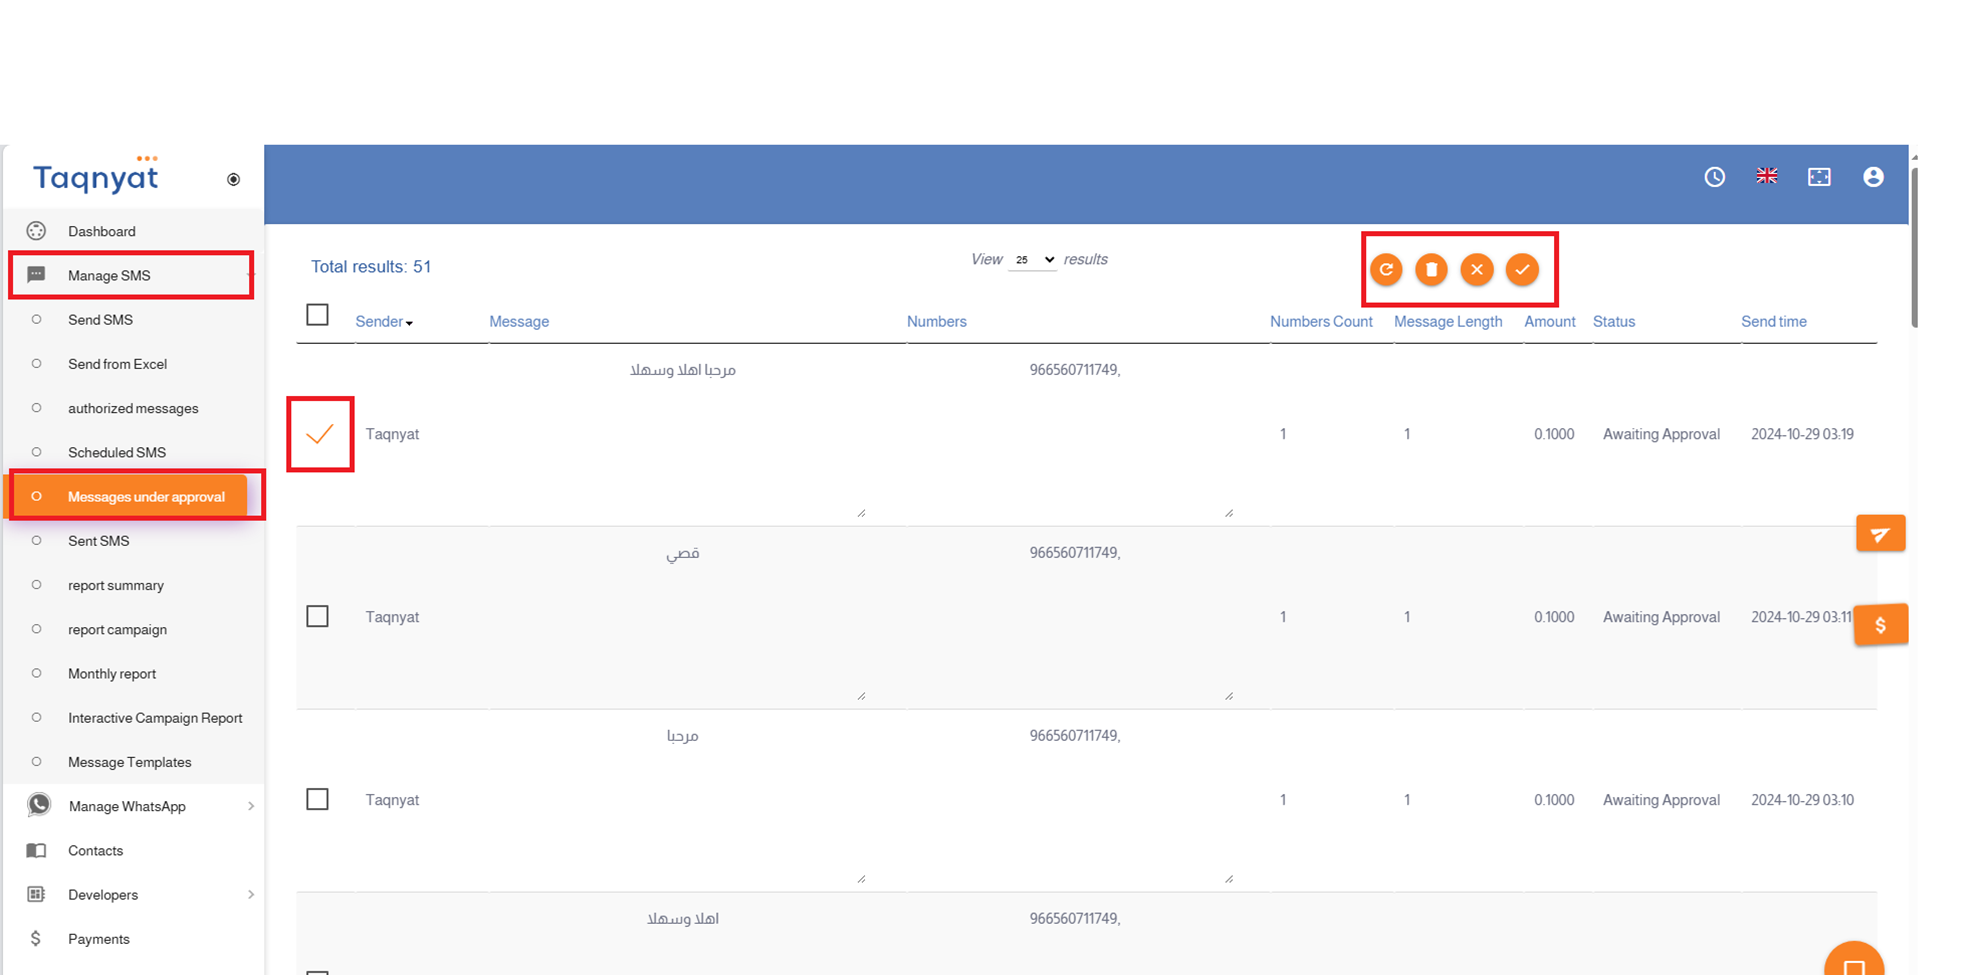
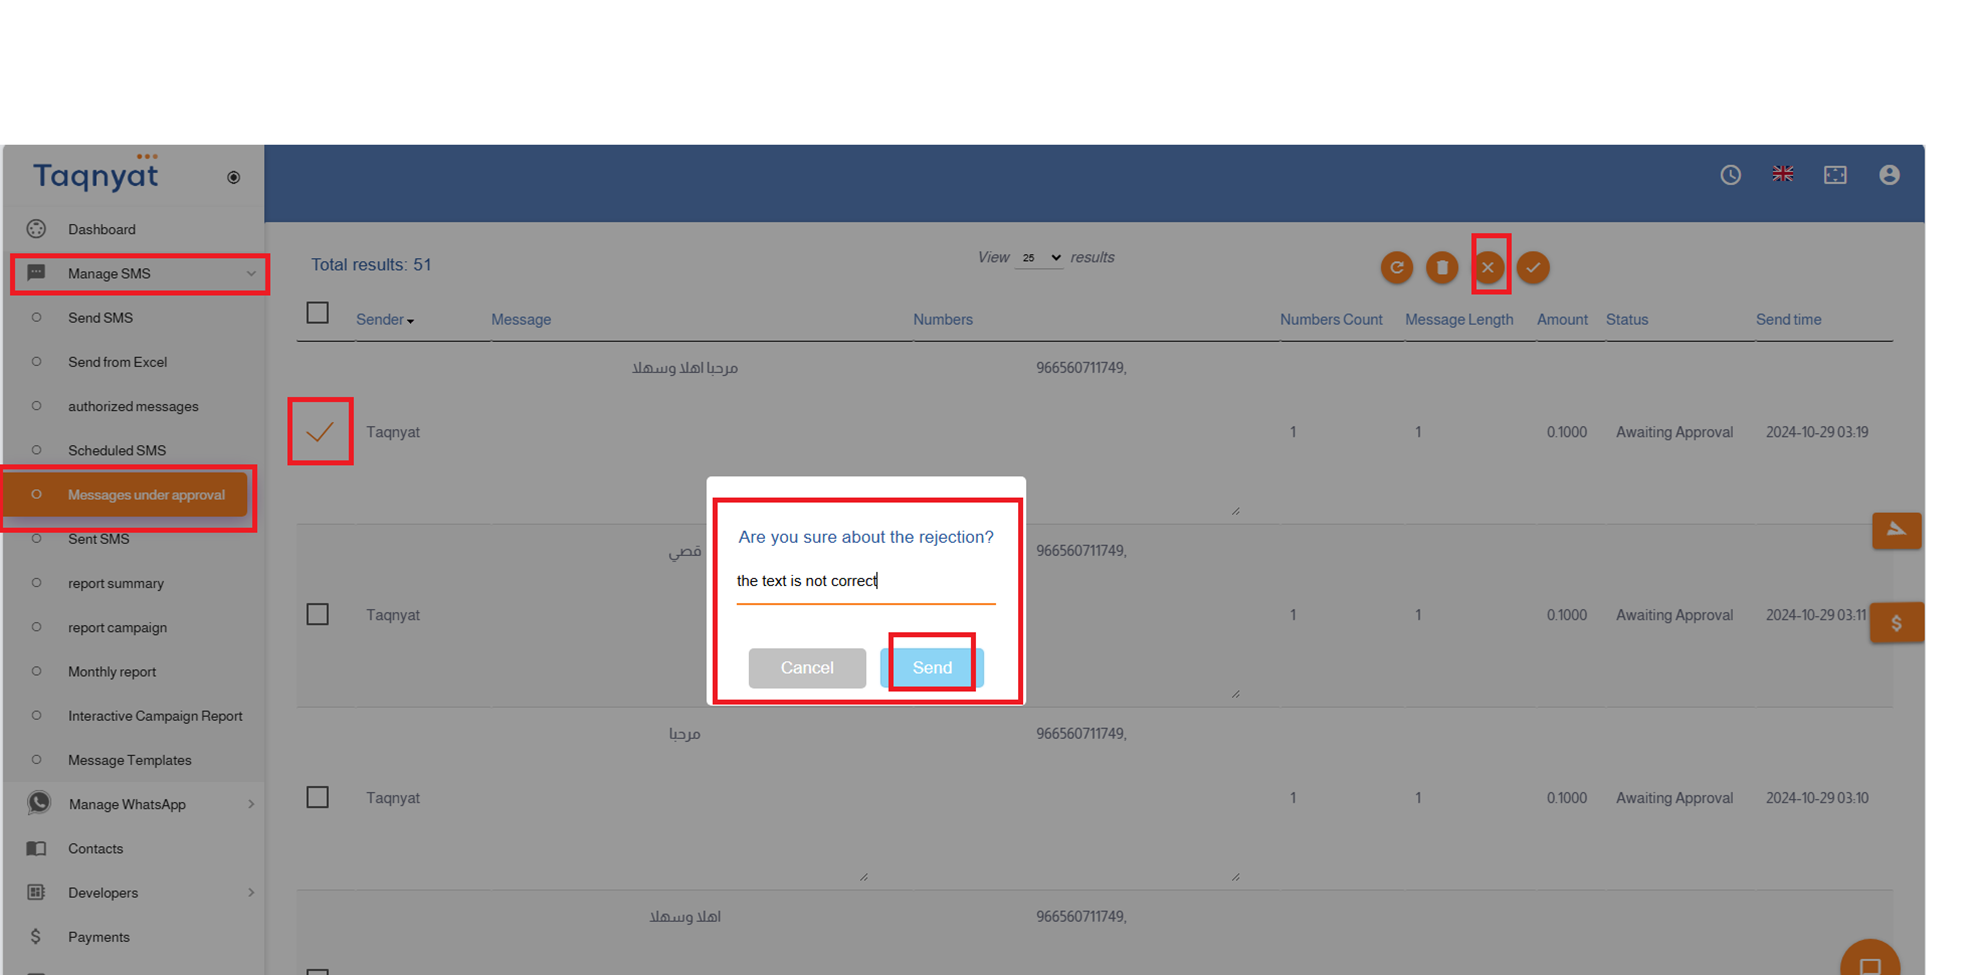
Authorized Messages are predefined templates assigned by the main account to sub-accounts. These messages can be sent directly from a sub-account without requiring prior approval from the main account.
How to Approve Authorized Messages from the Main Account:
- Log in to your account and select "SMS Management".
- Click on "Send Messages".
- Enter the authorized message content in the "Message Text" field.
- Click the Authorized Messages Save Icon located on the left side of the message text field.
Reference Image:
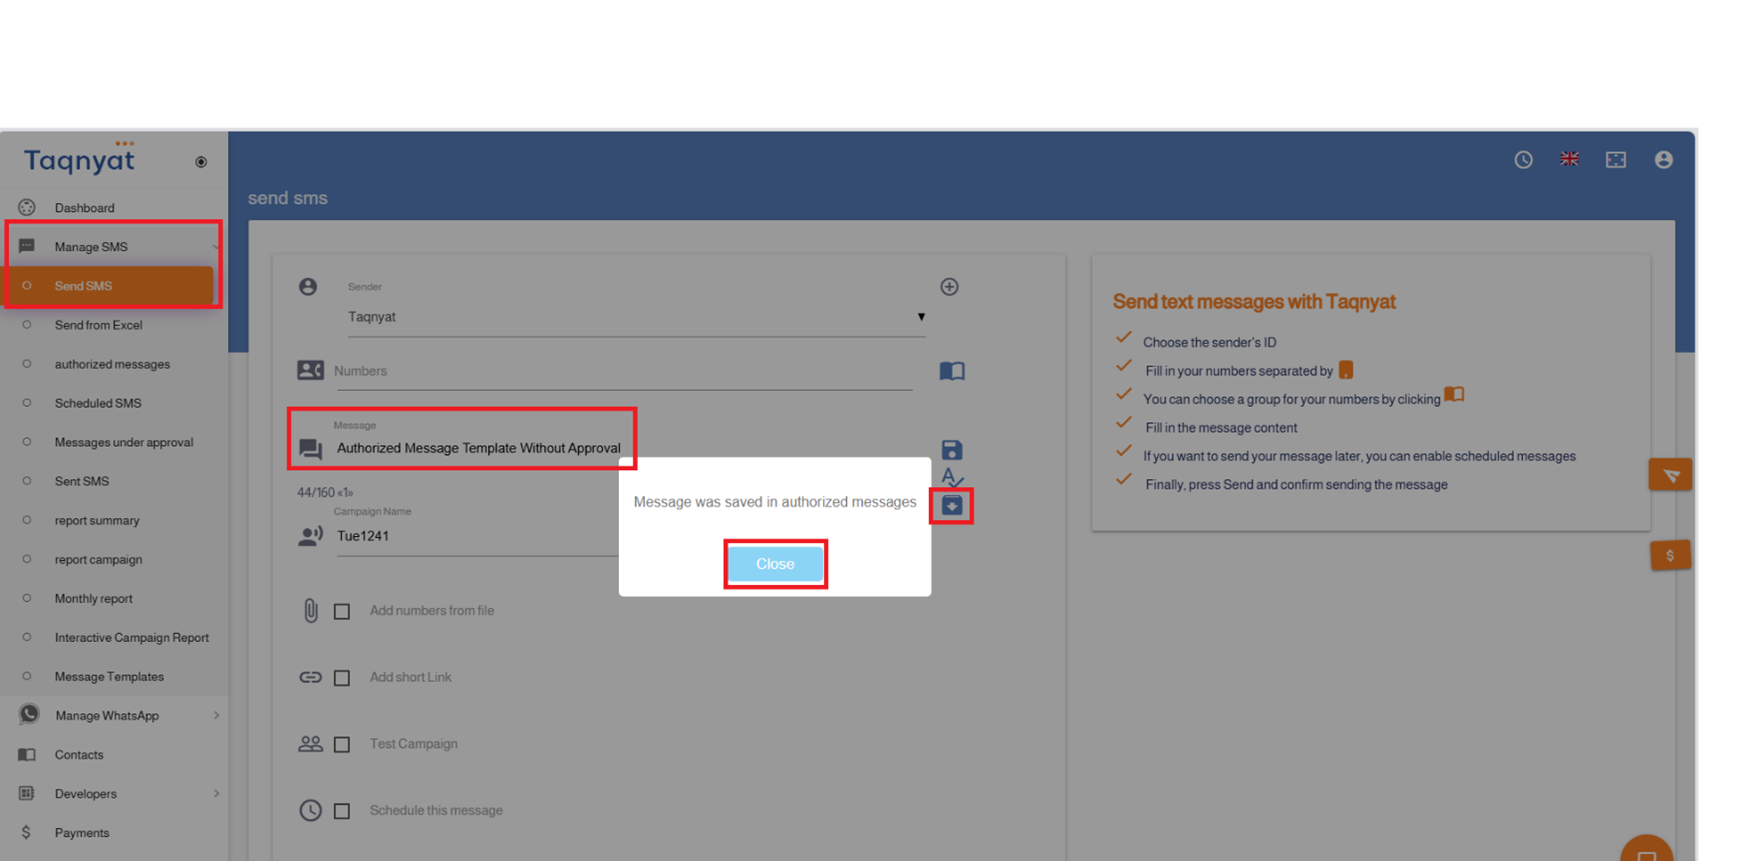
Second: How to Send an Authorized Message from a Sub-Account:
- Log in to your account and go to "SMS Management".
- Click on "Authorized Messages".
- Select the message you wish to send.
- Click the send icon to proceed to the message sending page.
- Complete the sending process.
Reference Image:
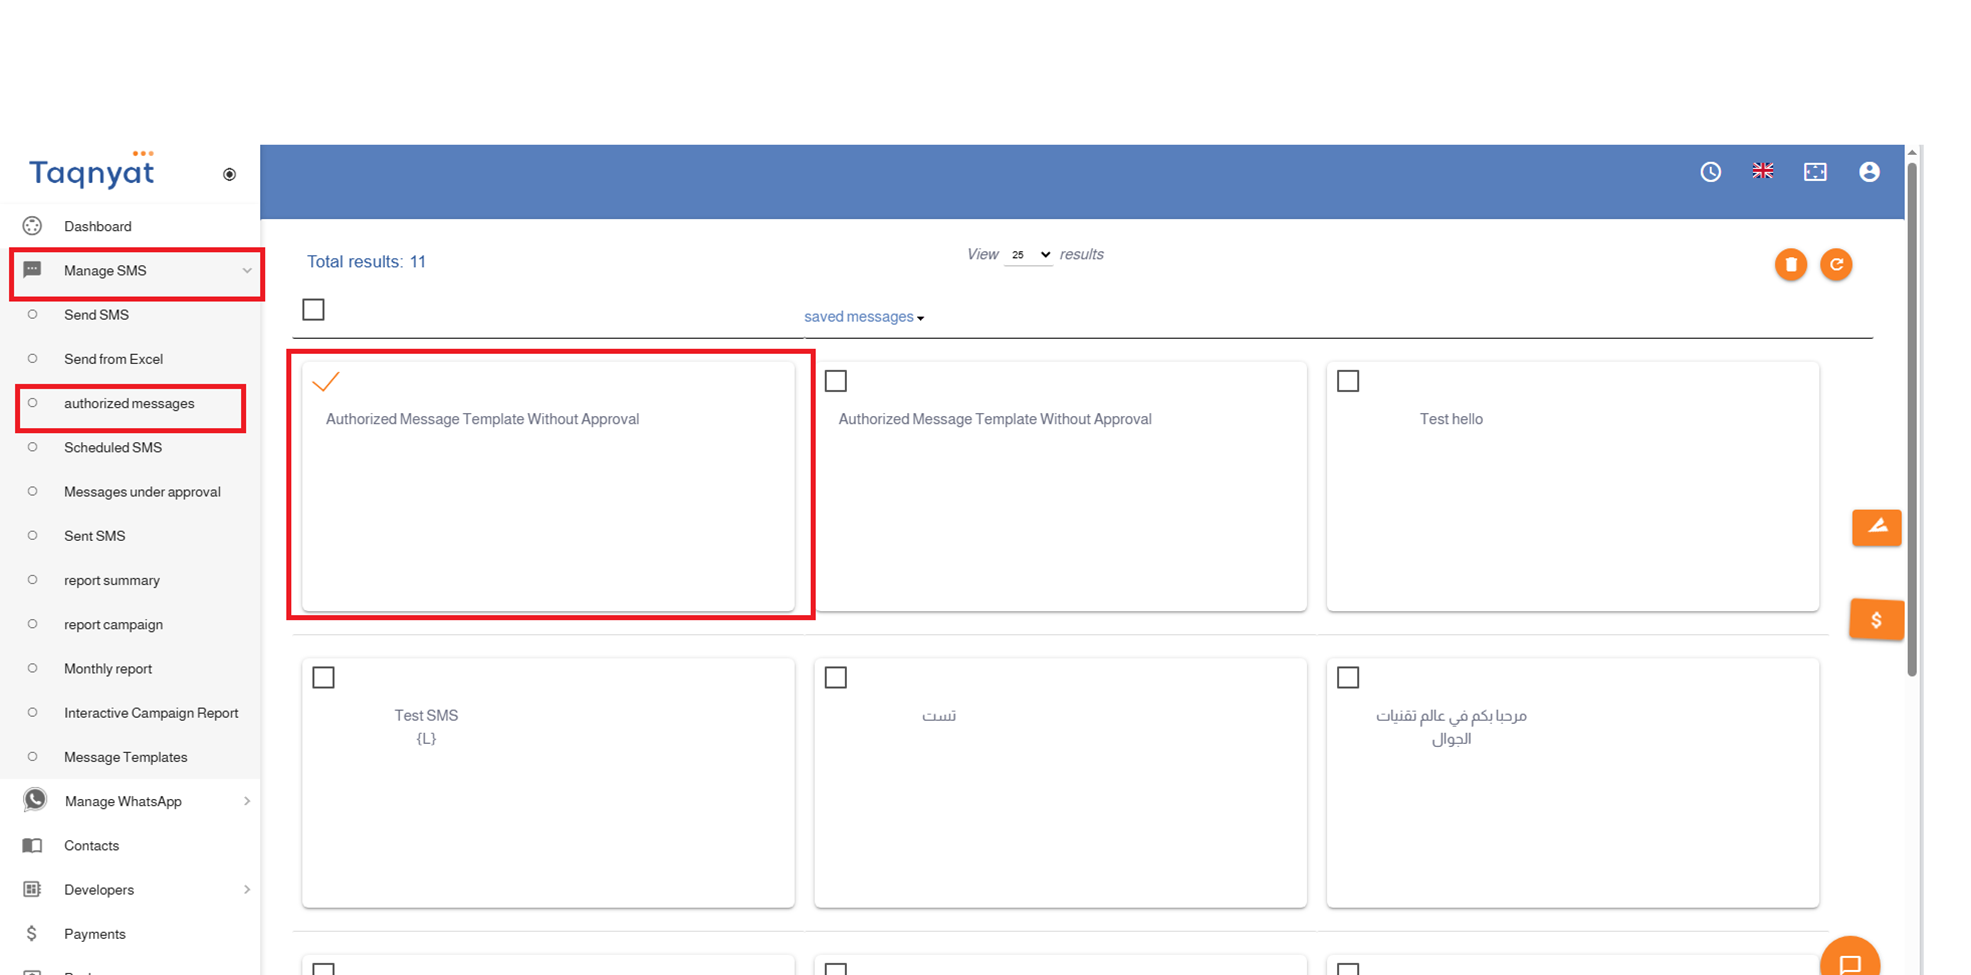
Please note that this service is not enabled by default and must be activated by requesting it through technical support.
Sub-Accounts Service
The Sub-Accounts service allows you to create multiple accounts that are fully managed and monitored from a single main account. This provides a practical and flexible solution for businesses with multiple departments, where each department can use the messaging service independently while remaining under centralized control.
This feature helps organize access permissions, track usage, and manage resources more efficiently in line with your company’s administrative structure.
Key Features of the Sub-Accounts Service
- The service is free of charge.
- You can create up to 5 sub-accounts, with the option to increase the number by contacting Technical Support.
- Ability to transfer credit from the main account to sub-accounts.
- Ability to transfer credit from sub-accounts back to the main account.
- Full control over sub-account permissions through the main account.
- Direct access to sub-accounts from the main account without requiring a password.
- The main account can view sub-account logs and records through a unified dashboard.
Important Notes on Financial Compliance
When adding a sub-account, you must first select the sub-account type. Each type is subject to specific financial controls, and full compliance with these rules is required, as outlined below:
1. Transfer Sub-Account
- Credit can be transferred only from the main account.
- Direct top-up or recharge is not allowed for this type of account.
2. Monitoring Sub-Account
- Direct top-up or recharge is allowed.
- Credit transfer from the main account is not permitted for this type of account.
How to Add a Sub-Account
There are two ways to add a sub-account, depending on whether the account already exists or needs to be created.
Option 1: Create a New Sub-Account (Account Not Registered)
If the sub-account is not registered and you would like to create a new one, please follow these steps:
- Log in to your account via: https://portal.taqnyat.sa/
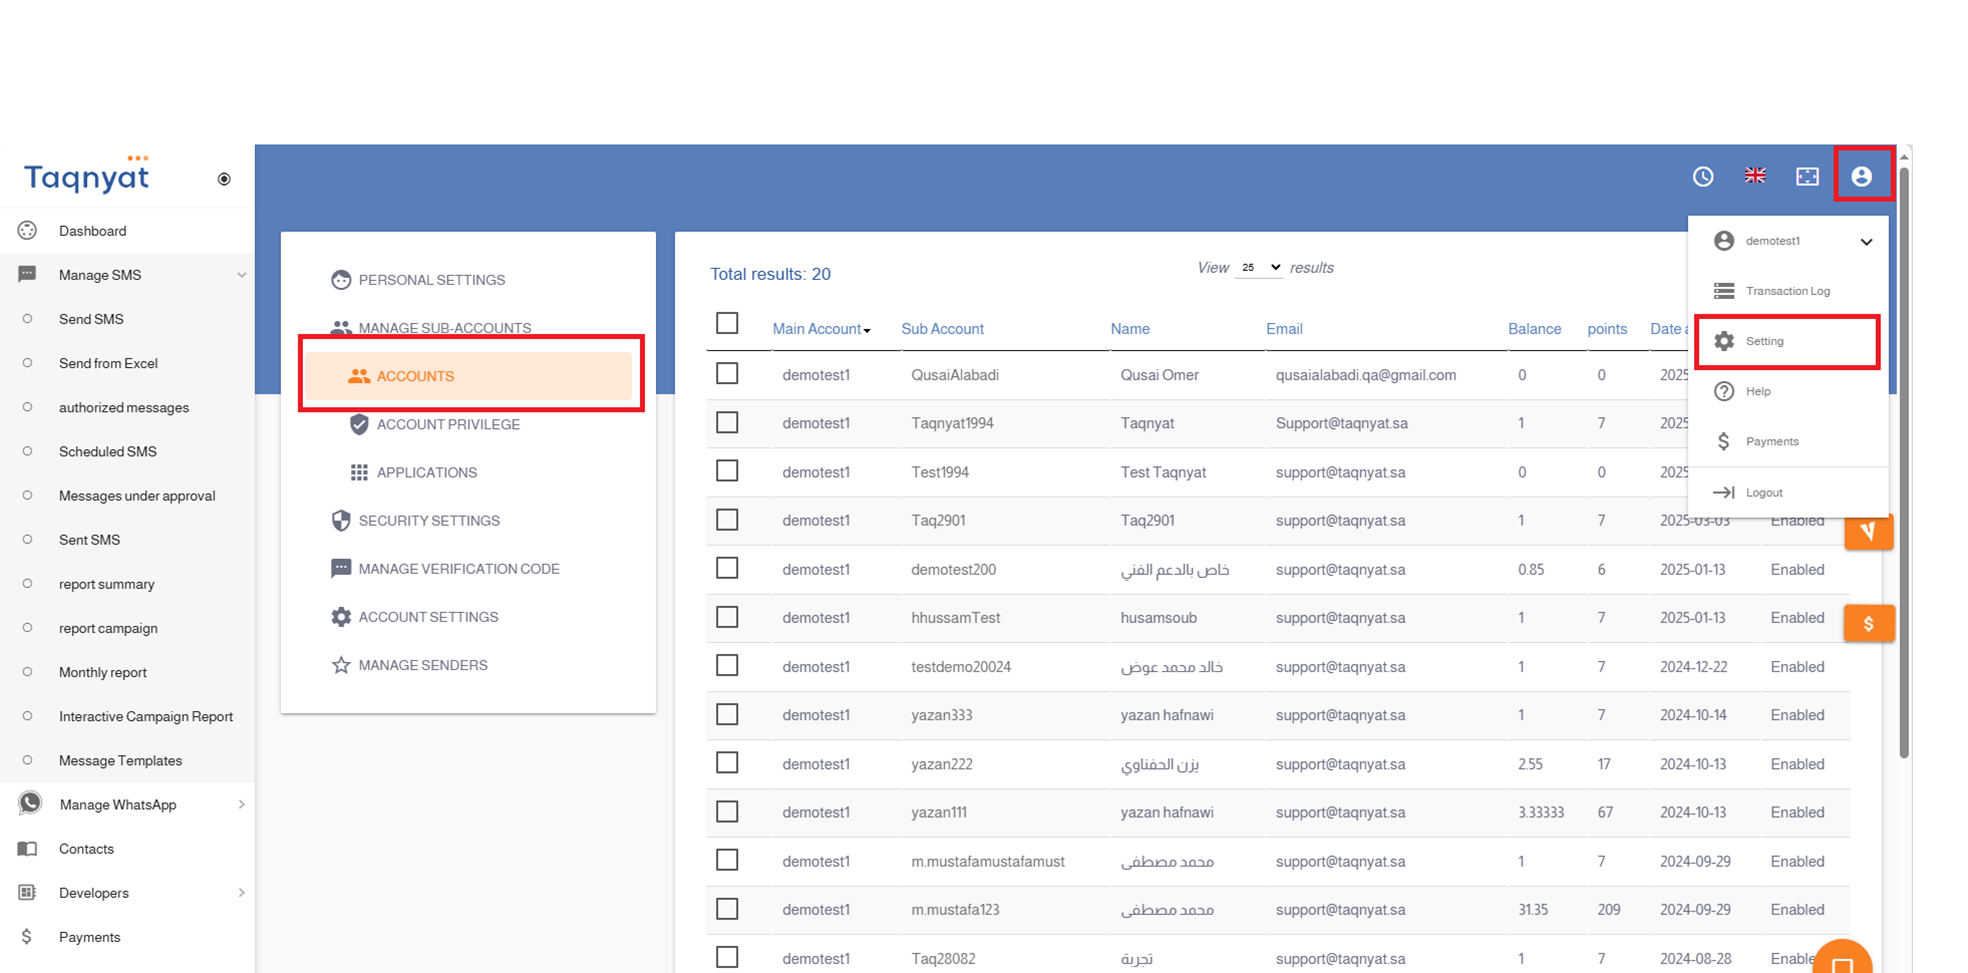
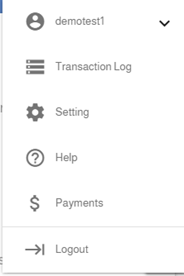
- Go to Settings.
- Select Sub-Accounts Management.
- Open the Accounts section.
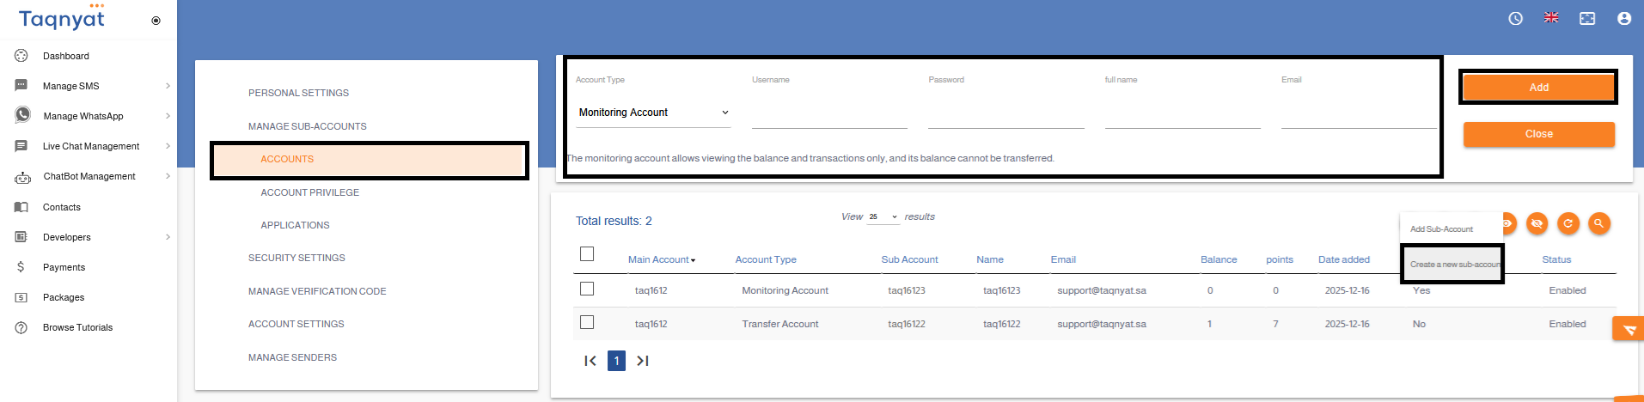
- Click the ( + ) icon, then choose Create New Sub-Account.
- Enter all required sub-account details and select the appropriate settings.
- Click Add to complete the sub-account creation successfully.
Option 2: Add an Existing Sub-Account (Already Registered)
If the sub-account is already registered on our platform, please follow these steps:
- Log in to your account via: https://portal.taqnyat.sa/
- Go to Settings.
- Select Sub-Accounts Management.
- Open the Accounts section.
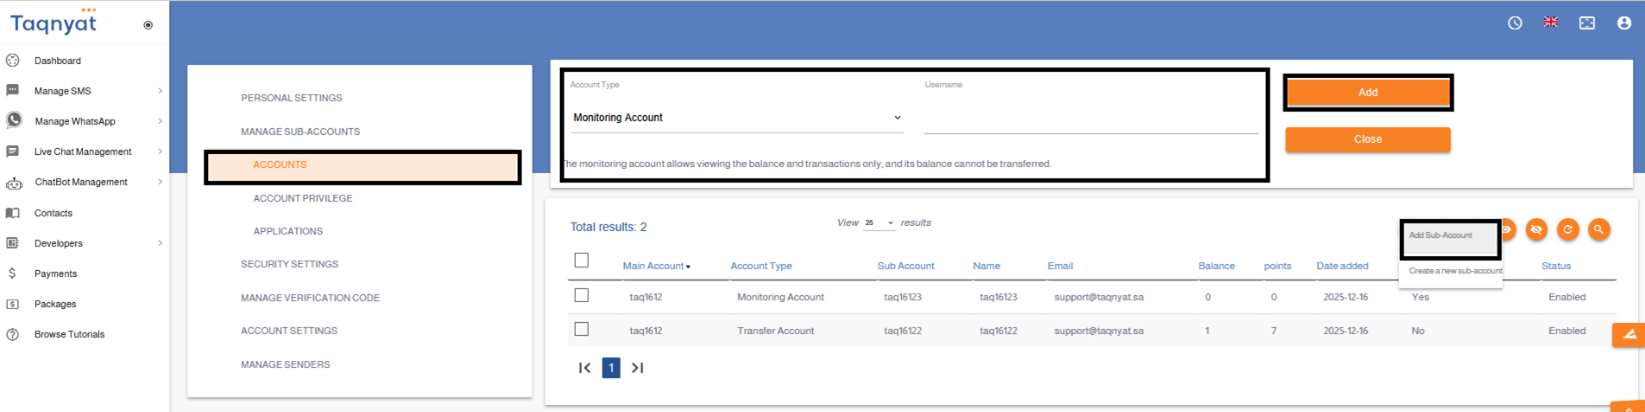
- Click the ( + ) icon, then choose Create New Sub-Account.
- Enter the required details for the account you wish to add and select the appropriate settings.
- Click Add.
- Wait for approval. The authorized user of the account being added must access the same section and approve the request to complete the process.
Sub-Accounts Service Settings
The following settings allow you to manage and control sub-accounts directly from the main account:
- Re-enable a Sub-Account
If a sub-account has been disabled, it can be re-enabled by selecting the account and clicking the Re-enable
- Enable Report Access for a Sub-Account
You may allow a sub-account to view the main account’s messaging reports by selecting the account and clicking the Enable Access
- Disable a Sub-Account
You can disable a sub-account by selecting the desired account and clicking the Disable
- Disable Report Access for a Sub-Account
If you wish to revoke a sub-account’s access to messaging reports, select the sub-account and click the Disable Access
Illustrative Images: How to Access the Sub-Accounts Option:
Illustrative Images: How to Create a New Sub-Account :
Illustrative Images: How to Add an Existing Account as a Sub-Account :
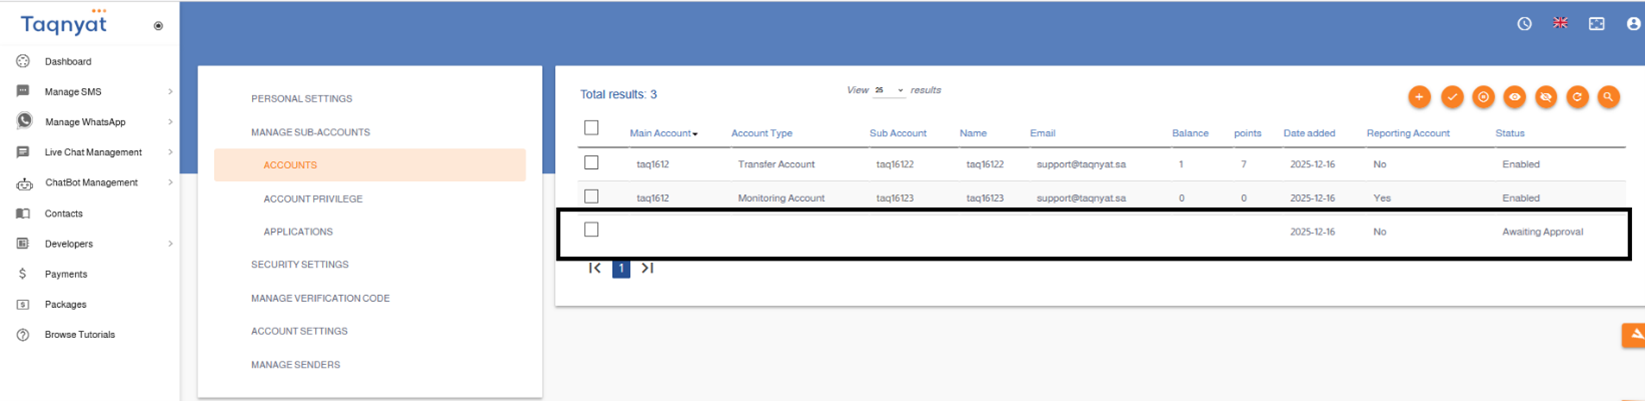
Illustrative Images: Sub-Accounts Service Settings:
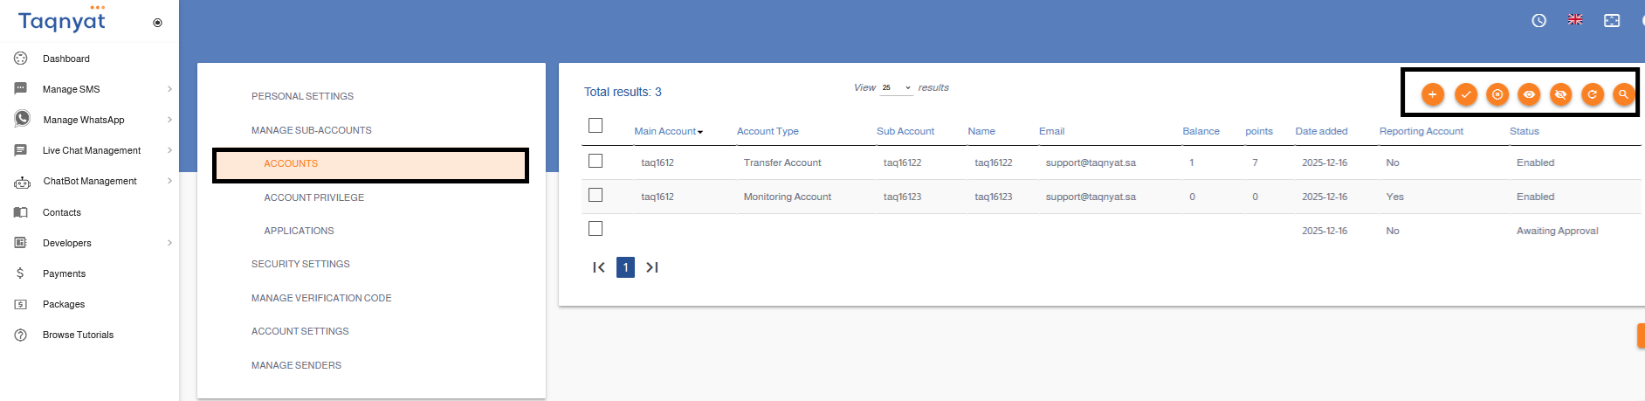
Main Account Features:
- View the balances of sub-accounts.
- Manage sub-account balances by transferring credits.
- Access sub-accounts without the need for a password or verification code by simply clicking on the account name, allowing full control over the sub-account, including sending messages, viewing delivery and send reports, and adjusting account settings.
- Control the security settings related to the sub-account’s API access, including enabling or disabling API keys and managing the authorized server IP addresses permitted to access and send through the sub-account.
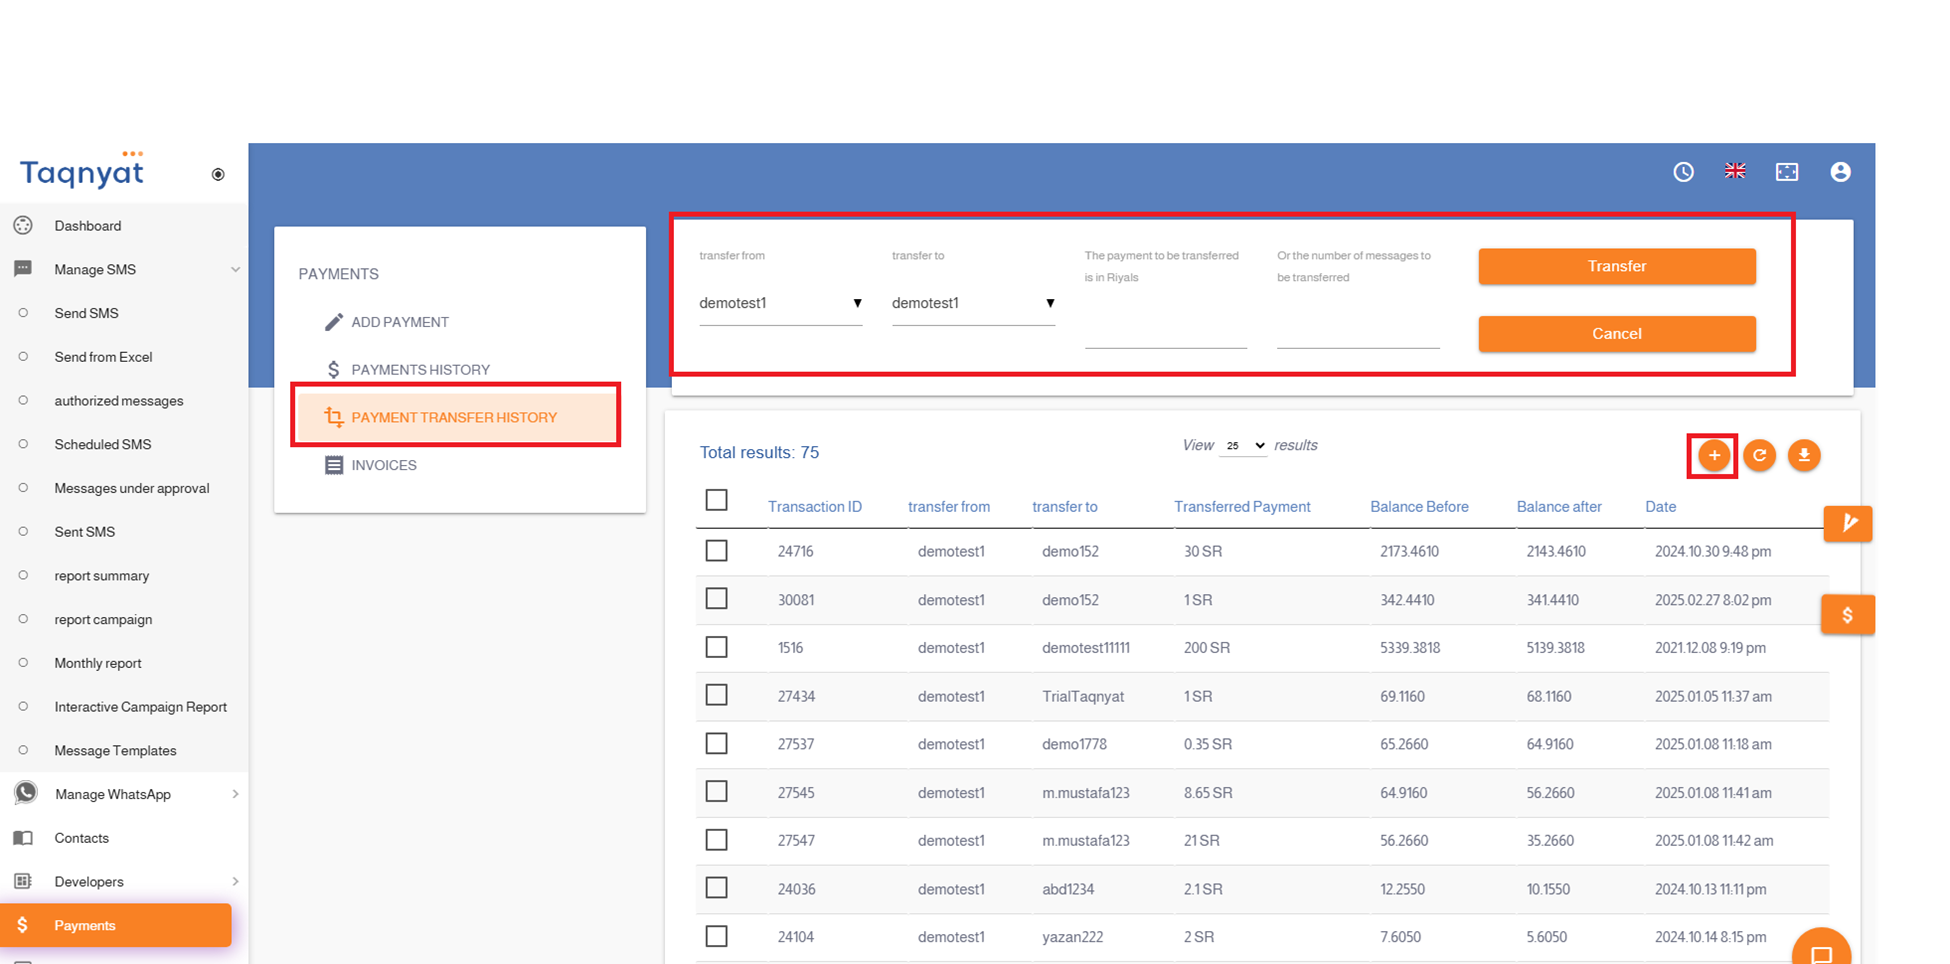
You can transfer credits between your main account and sub-accounts. Additionally, the main account can transfer credits between sub-accounts or withdraw credits from a sub-account and return them to the main account by following these steps:
- Log in to your account via https://portal.taqnyat.sa/
- Select Payments
- Click on the + icon
- Select the account you wish to transfer from
- Select the account you wish to transfer to
- Enter the amount or number of messages to be transferred
- Click Transfer to complete the process
Reference Image:
Balance reminder
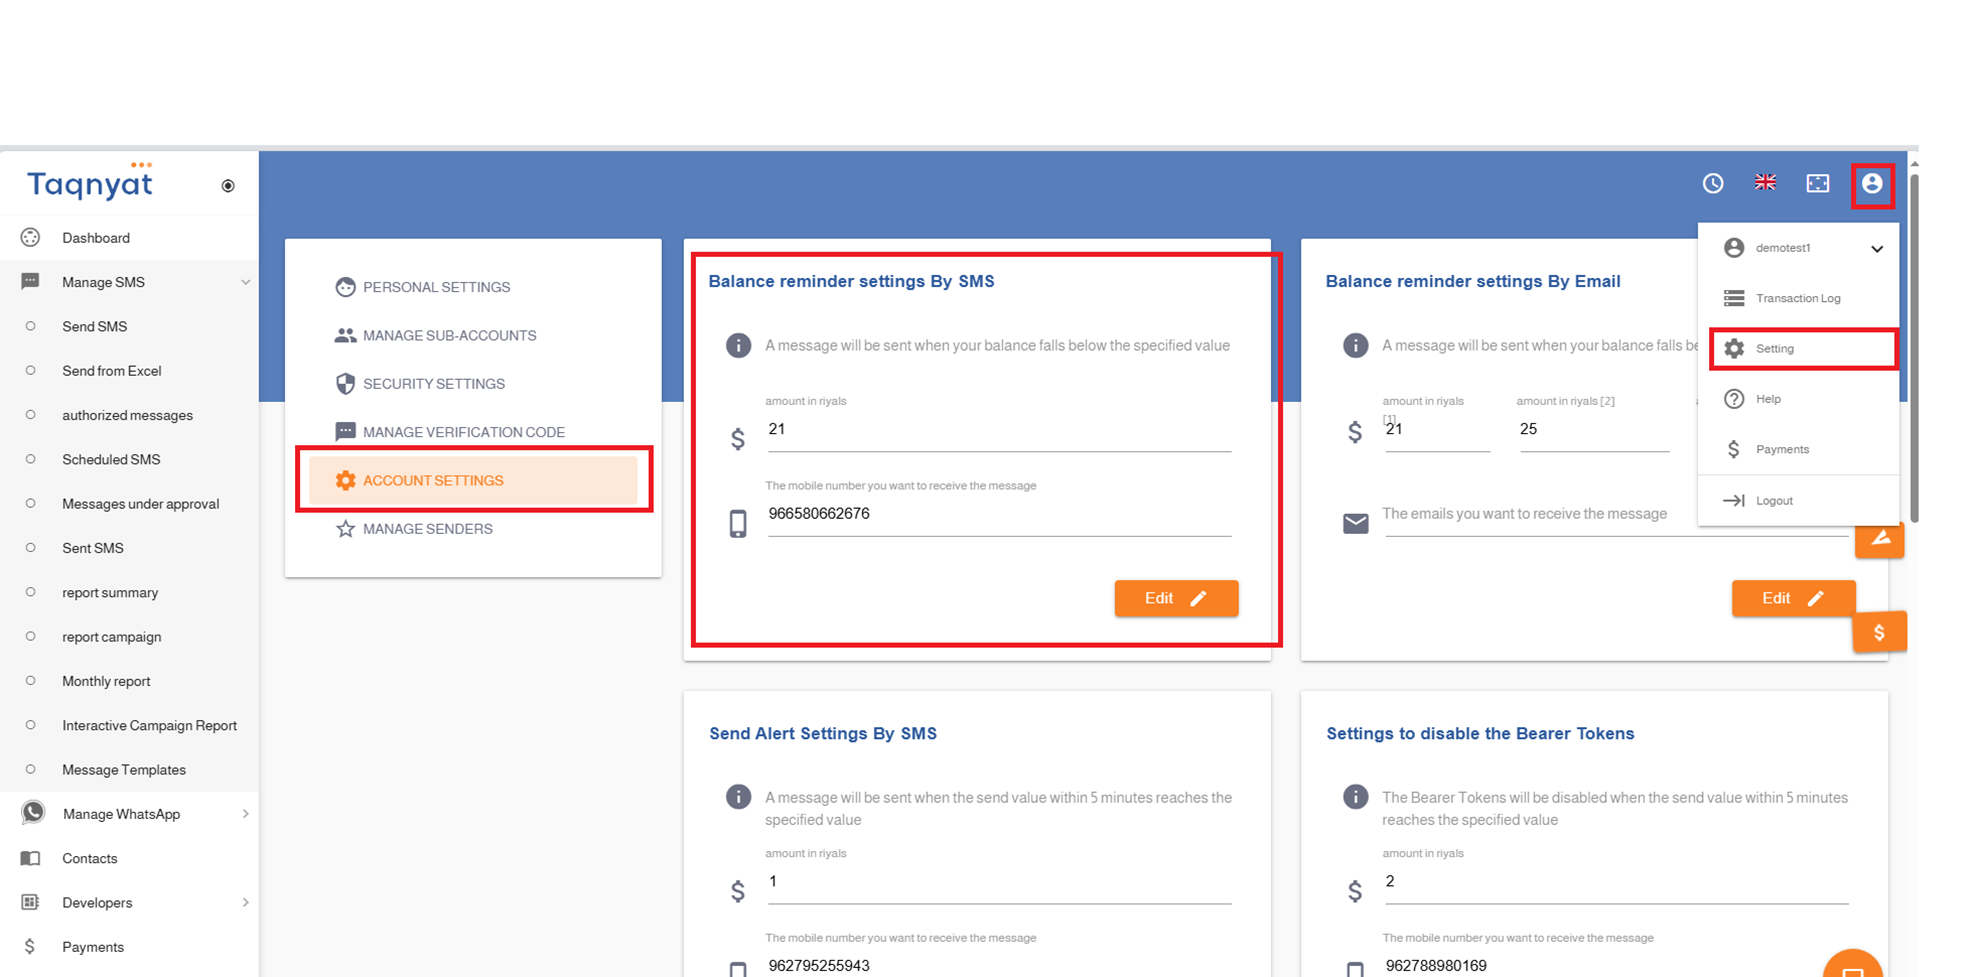
You can enable the SMS alert feature when your account balance reaches a certain threshold by following these steps:
- Log in to your account via https://www.taqnyat.sa
- Go to Settings
- Select Account Settings
- Under Balance Reminder Settings, enter the balance amount at which you would like to receive an alert, and specify the mobile number to which the alert should be sent.
Reference Image:
Email balance reminder settings
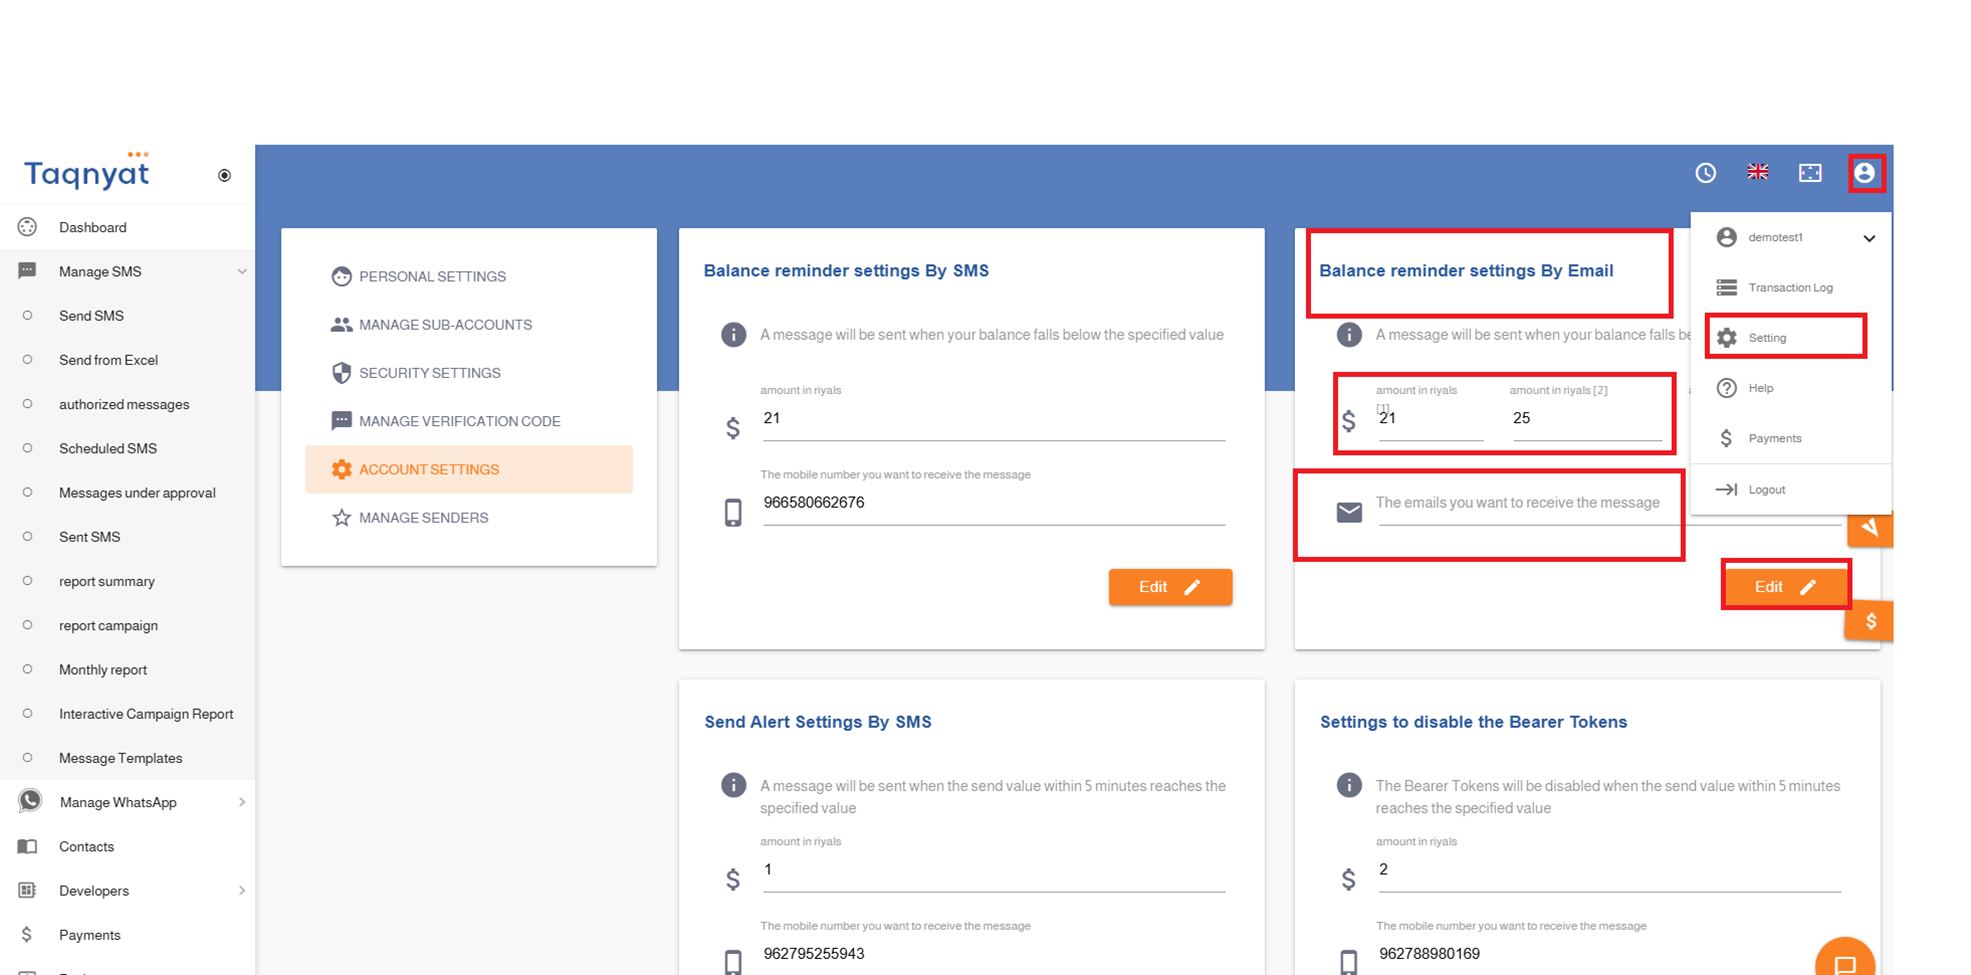
Email Balance Reminder Settings is a feature that allows you to automatically send a notification to a specified email address when your account balance reaches a certain threshold. This feature also enables you to set up to three different balance levels, and an automatic notification will be sent to the email when the balance reaches any of these levels.
To activate this feature, please follow these steps:
- Log in to your account via https://www.taqnyat.sa
- Go to Settings
- Select Account Settings
- In the Email Balance Reminder Settings section, enter the balance levels at which you want to receive alerts and provide the email address where the alerts should be sent
- Click Update to activate the Email Balance Reminder feature
Reference Image:
Sending alert
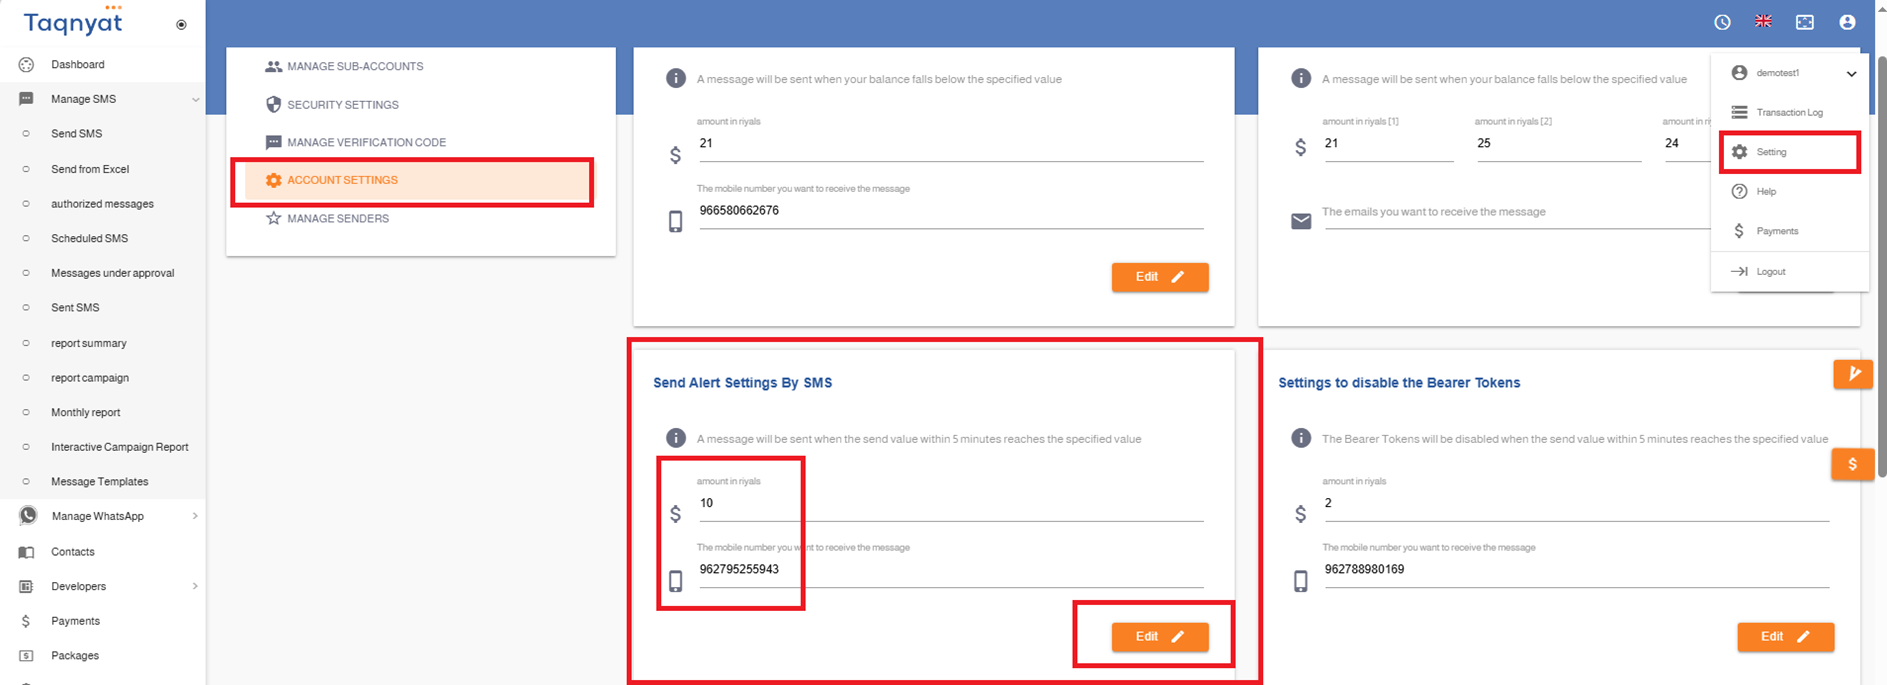
You can enable the SMS Notification Feature to receive an alert when your account balance reaches a specified threshold by following these steps:
- Log in to your account via https://portal.taqnyat.sa/
- Go to Settings
- Select Account Settings
- Under the Sending Alert Settings section, specify the threshold amount that will trigger the alert if the sending value reaches this limit within 5 minutes
- Enter the mobile number to which the alert SMS should be sent
Reference Image:
Blocking the sending network
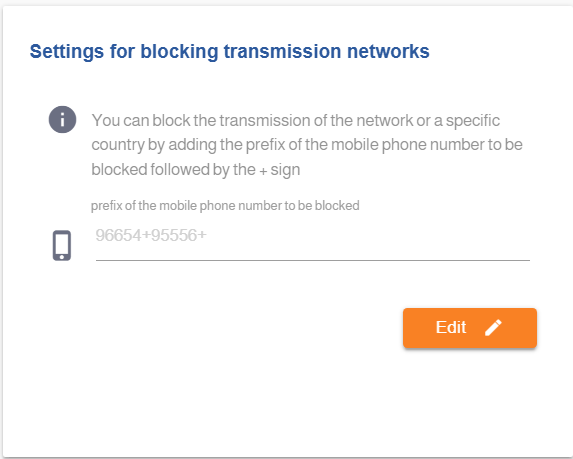
Using the "Send Network Blocking Settings" feature, you can block message sending to a specific network, country, or number by following these steps:
- Log in to your account via https://portal.taqnyat.sa/
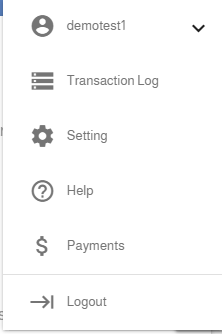
- Go to Settings
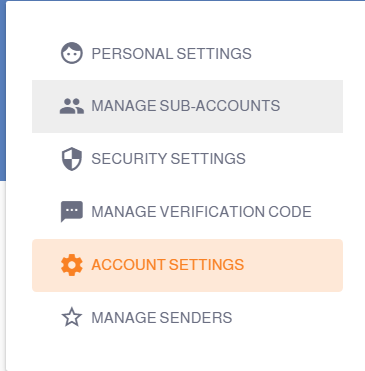
- Select Account Settings
- Under the Send Network Blocking Settings section, enter the number prefix you want to block.
- Click Update to complete the process.
o You can add multiple prefixes by entering them horizontally and separating each with a + sign.
Reference Image:
Reports Account
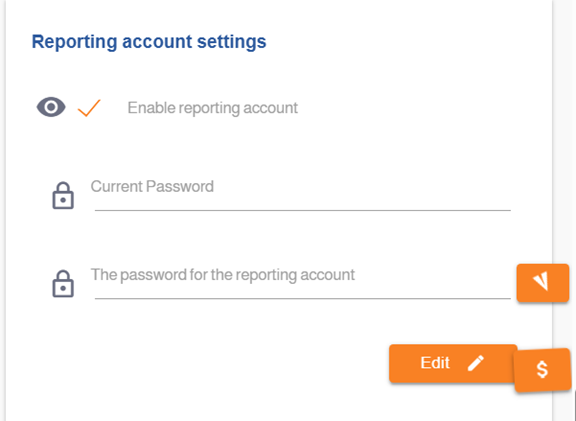
The "Report Account Settings" feature allows you to create a limited-access version of your main account. This enables a user to view delivery reports only, without the ability to send messages or access and modify account settings.
To create a report account, please follow these steps:
- 1. Log in to your account via https://portal.taqnyat.sa/
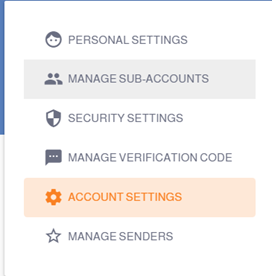
- 2. Go to Settings
- 3. Select Account Settings
- 4. In the Report Account Settings section, enable the option "Activate Report Account"
- 5. Enter your current account password
- 6. Enter the desired password for the report account
- 7. Click Update to complete the process
Once the user logs in using the report account password, they will only be able to view delivery reports and will not have permission to send messages or access account settings.
Reference Image:
Session Duration Setting
The "Session Duration Setting" feature helps maintain the security of your account by allowing you to define the time duration for which your session remains active on the website. If there is no activity within the specified time, the system will automatically log you out.
To configure the session duration, please follow these steps:
- Log in to your account via https://portal.taqnyat.sa/
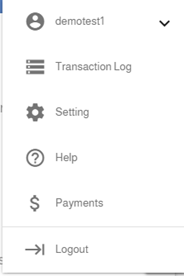
- Go to Settings
- Select Account Settings
- Set the desired session duration under the option "Session Duration Setting"
- Click Update to complete the process
Reference Image:
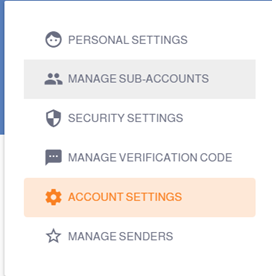
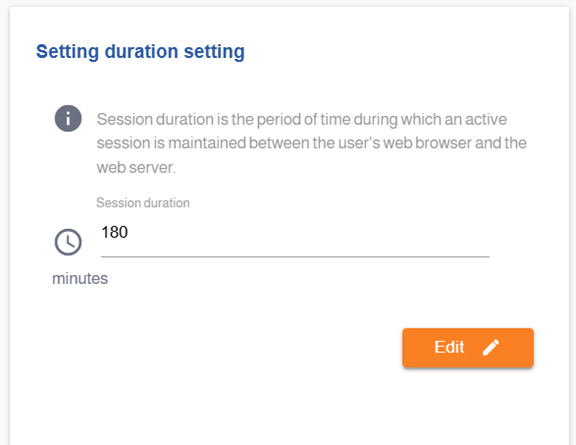
Sub-Account Balance Recharge Settings
The "Sub-Account Balance Auto-Top-Up Settings" feature allows you to automatically fund sub-accounts. When a sub-account has insufficient balance and attempts to send a message, the required balance will be deducted from the main account automatically.
To enable automatic top-up for sub-accounts, please follow these steps:
- Log in to your account via https://portal.taqnyat.sa/
- Go to Settings
- Select Account Settings
- Enable the option "Sub-Account Balance Auto-Top-Up Settings"
- Click Update to complete the process
Reference Image:
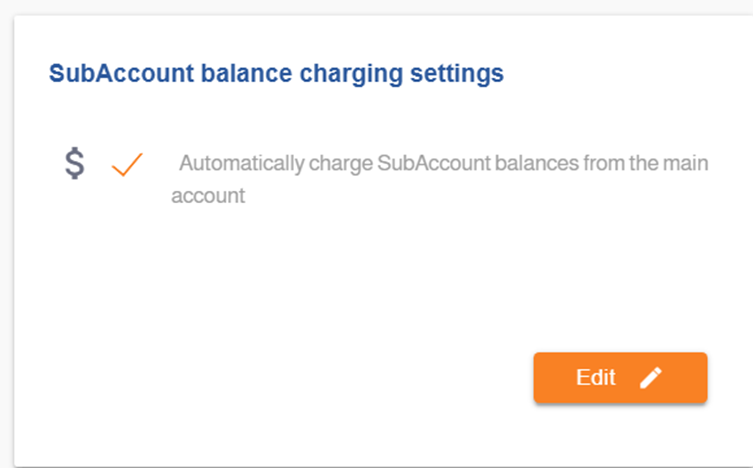
Transaction Log Activity
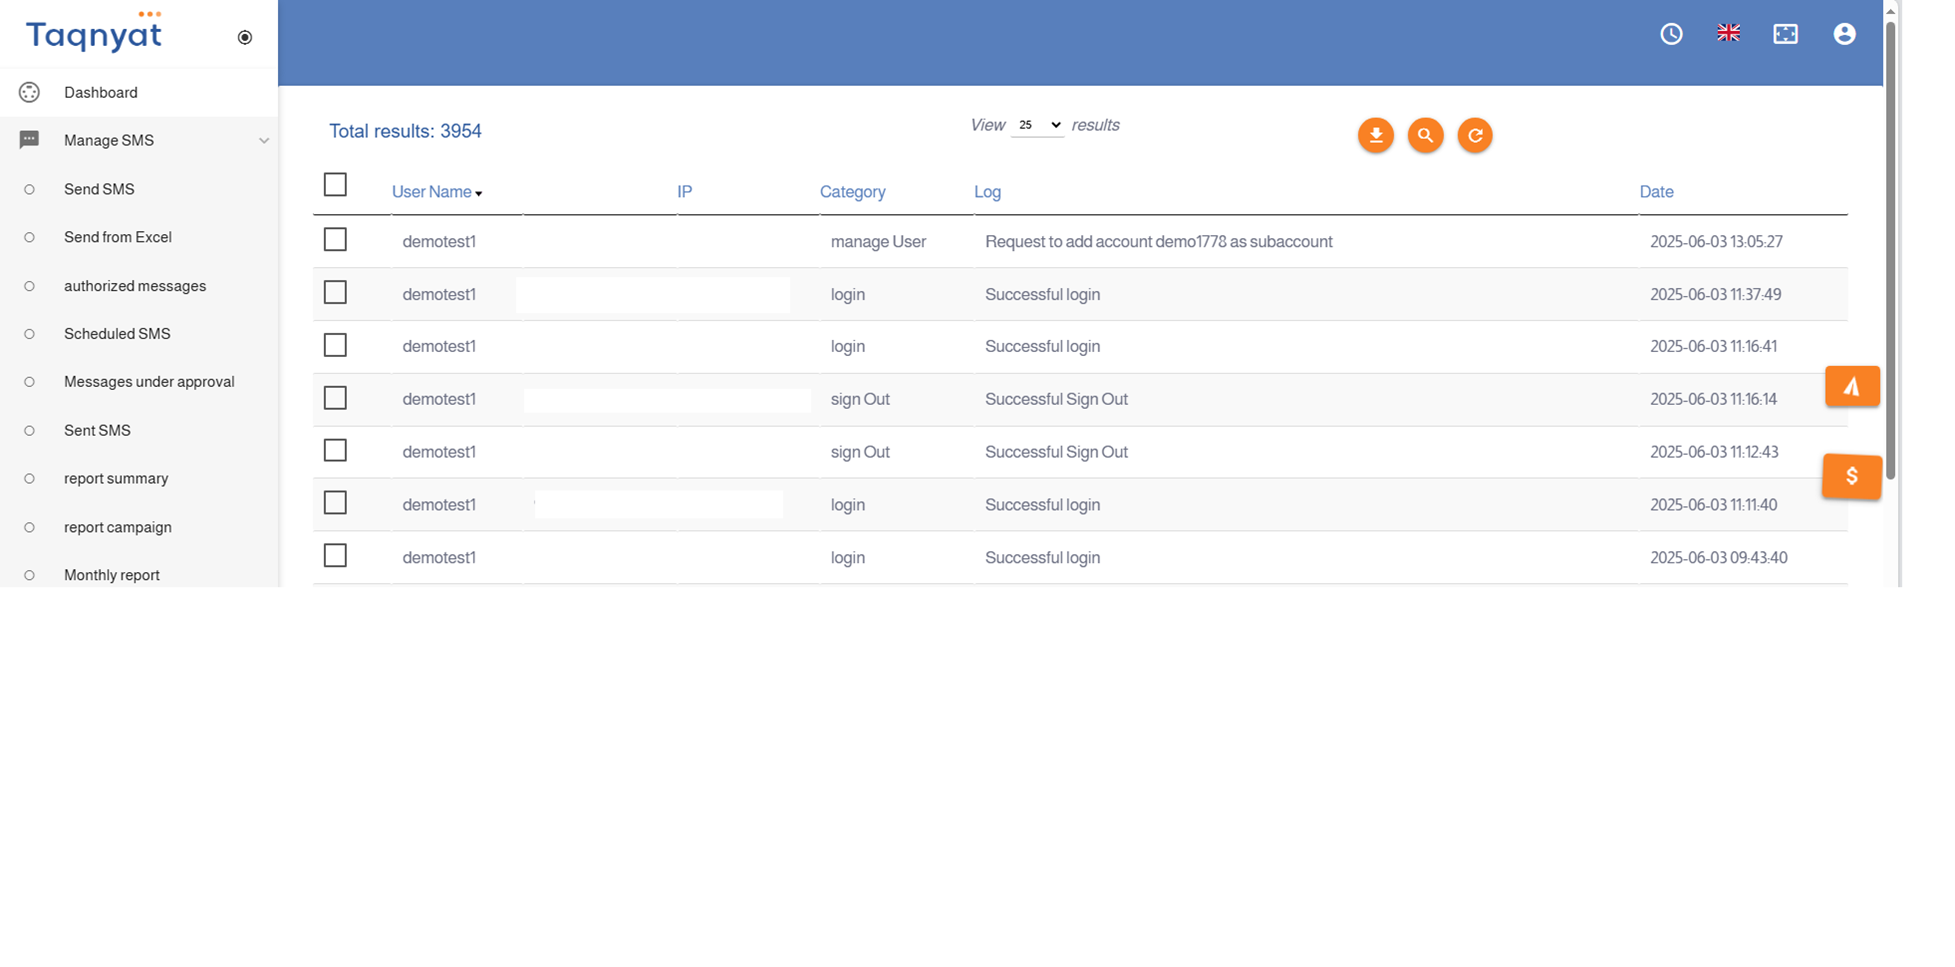
The "Activity Log" feature records all actions performed on your account within our platform. You can view and review these logs at any time from your account. This feature also allows the main account to monitor all activities carried out on both the main and sub-accounts.
To access the Activity Log, please follow these steps:
- Log in to your account via https://portal.taqnyat.sa/
- Go to Settings
- Select Activity Log
Reference Image:
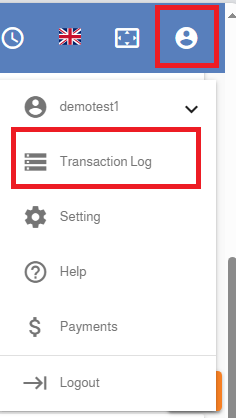
Account Permissions
Sub-Account Permissions Feature
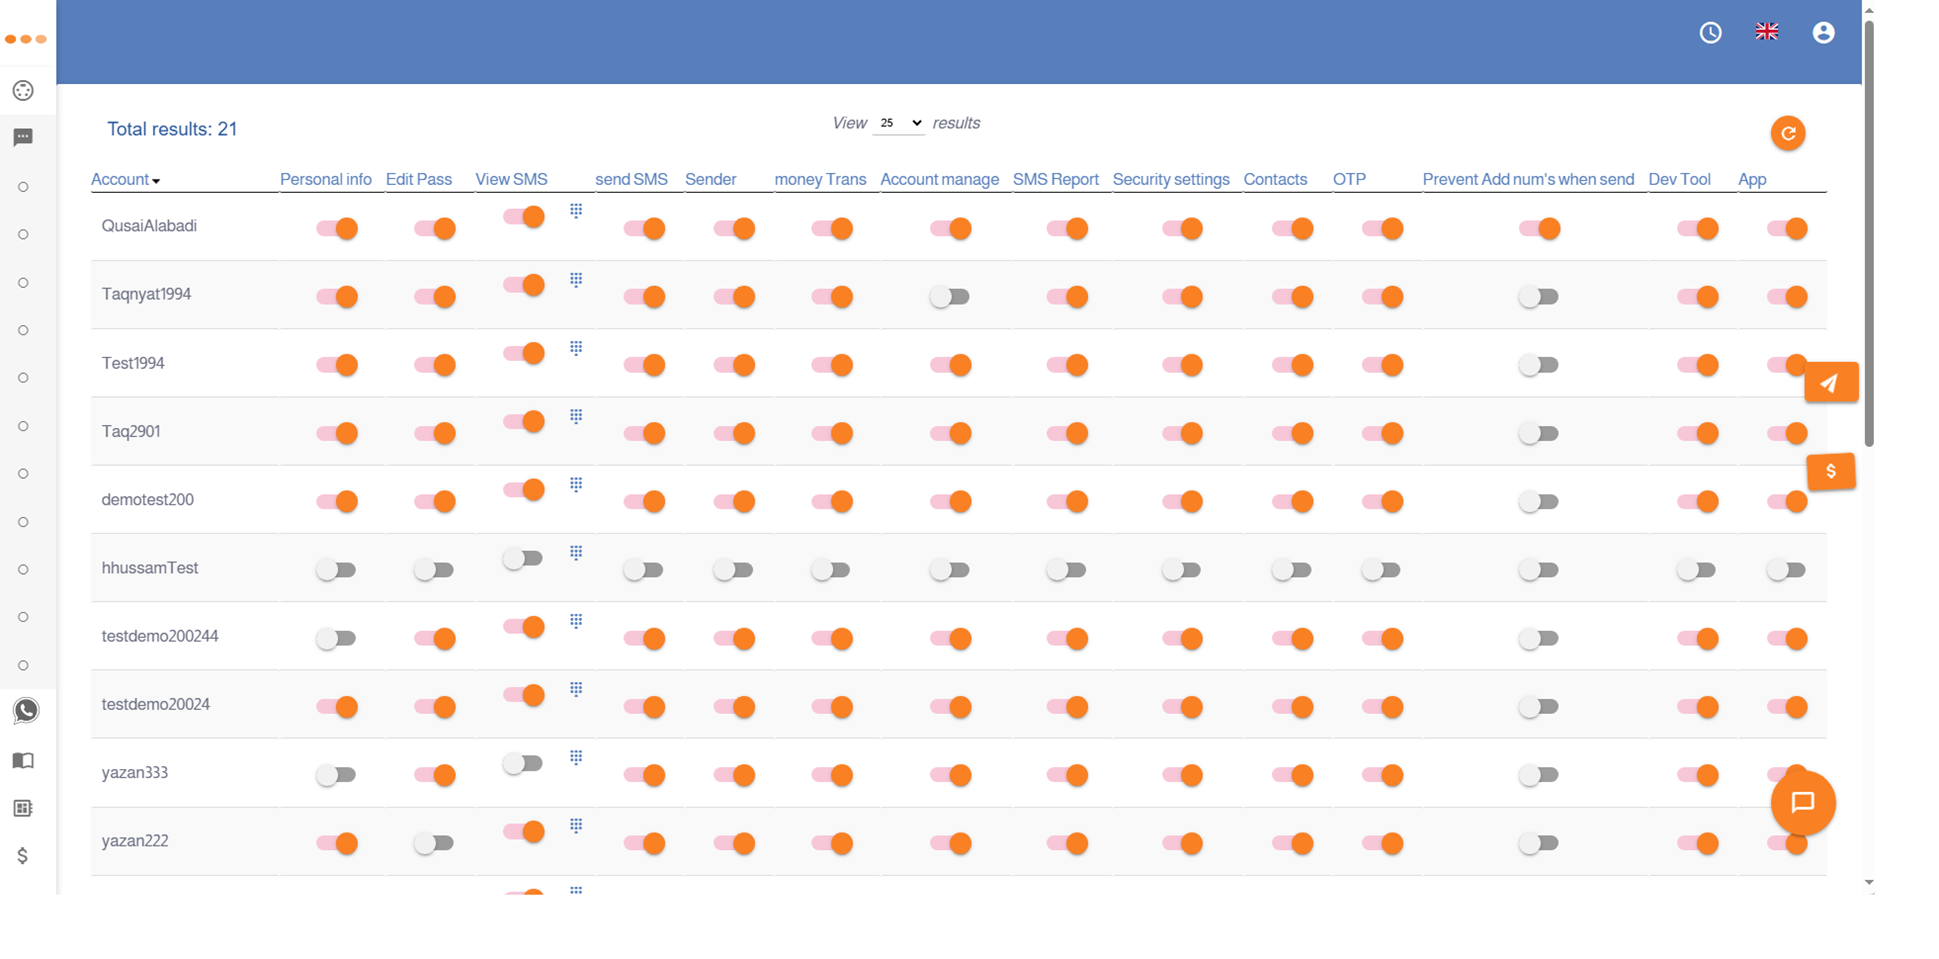
The "Sub-Account Permissions" feature allows the main account to control the permissions granted to sub-accounts. Through this feature, you can enable or disable one or all permissions for any sub-account.
To view and manage the permissions granted to sub-accounts, please follow these steps:
- Log in to your account via https://portal.taqnyat.sa/
- Select Settings
- Go to Sub-Account Management
- Click on Account Permissions
Below is a description of the permissions that the main account can manage. All of these can be directly modified through the main account by accessing each sub-account:
- Personal Information: Disable access to or editing of personal information stored in the sub-account.
- Change Password: Disable the ability to change the password from the sub-account.
- View Messages: Disable the ability to view details of sent messages. Specific details such as email addresses, numbers in the message body, or certain keywords can also be hidden.
- Enable Sending: Disable sending messages entirely from the sub-account.
- Sender Name: Disable the ability to add new sender names from the sub-account.
- Balance Transfer: Disable the ability to transfer balance from the sub-account to other accounts.
- Account Management: Disable the ability to add other sub-accounts under the sub-account.
- Sending Reports: Disable access to message sending reports.
- Security Settings: Disable control over security settings, including adding IPs to the whitelist
- Contacts: Disable the ability to store names and numbers.
- Verification Code: Disable the ability to add trusted numbers to receive login verification codes
- Add Numbers During Sending: Disable the ability to manually enter numbers in the recipient box.
- Developer Tools: Disable the ability to add webhooks via the sub-account.
- Applications: Disable the ability to add Bearer Tokens via the sub-account.
Reference Image: