Sending Messages
Sending Messages with a Uniform Text
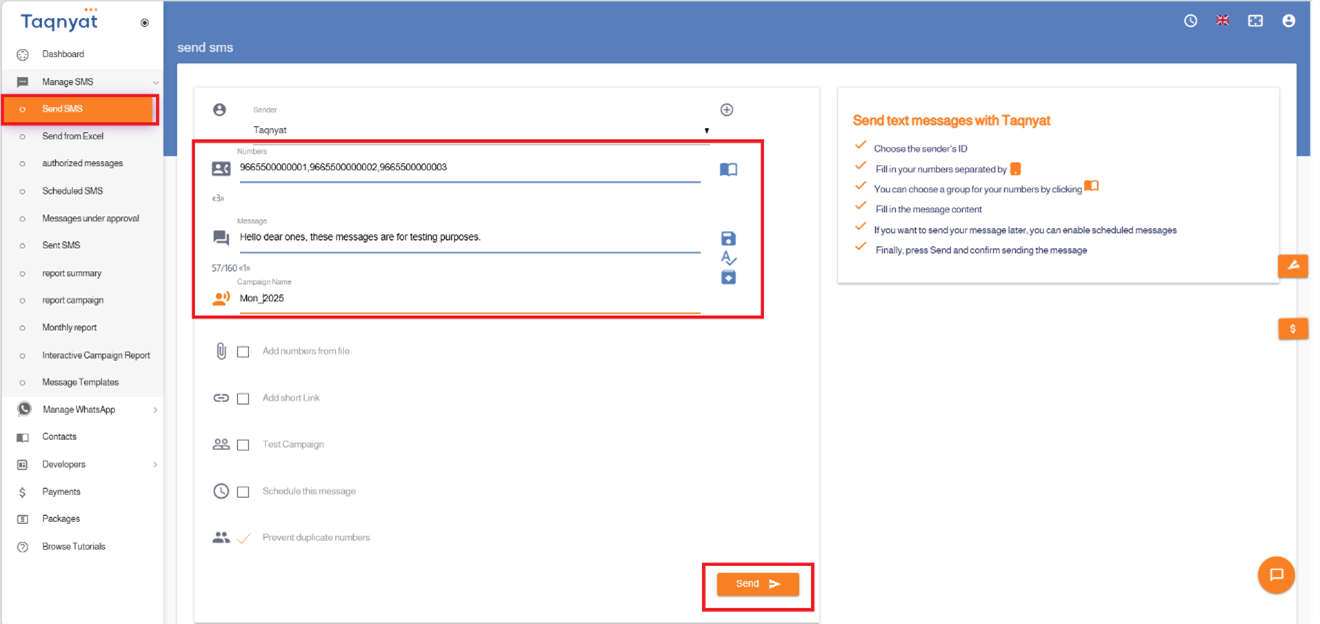
To send a uniform text message to all numbers, please follow these steps:
- Log in to your account at https://portal.taqnyat.sa/
- Select SMS Management.
- Choose Send Messages.
- Select the sender name.
- Enter the numbers you want to send the message to
- Type the message text.
- Click Send
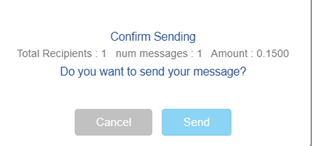
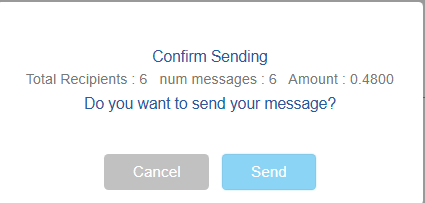
- Verify the number of recipients and messages to be sent, then confirm the sending.
Reference Image:
Sending messages with variable text
To send messages containing variables, you can follow these methods:
First: Numbers and text in an Excel file
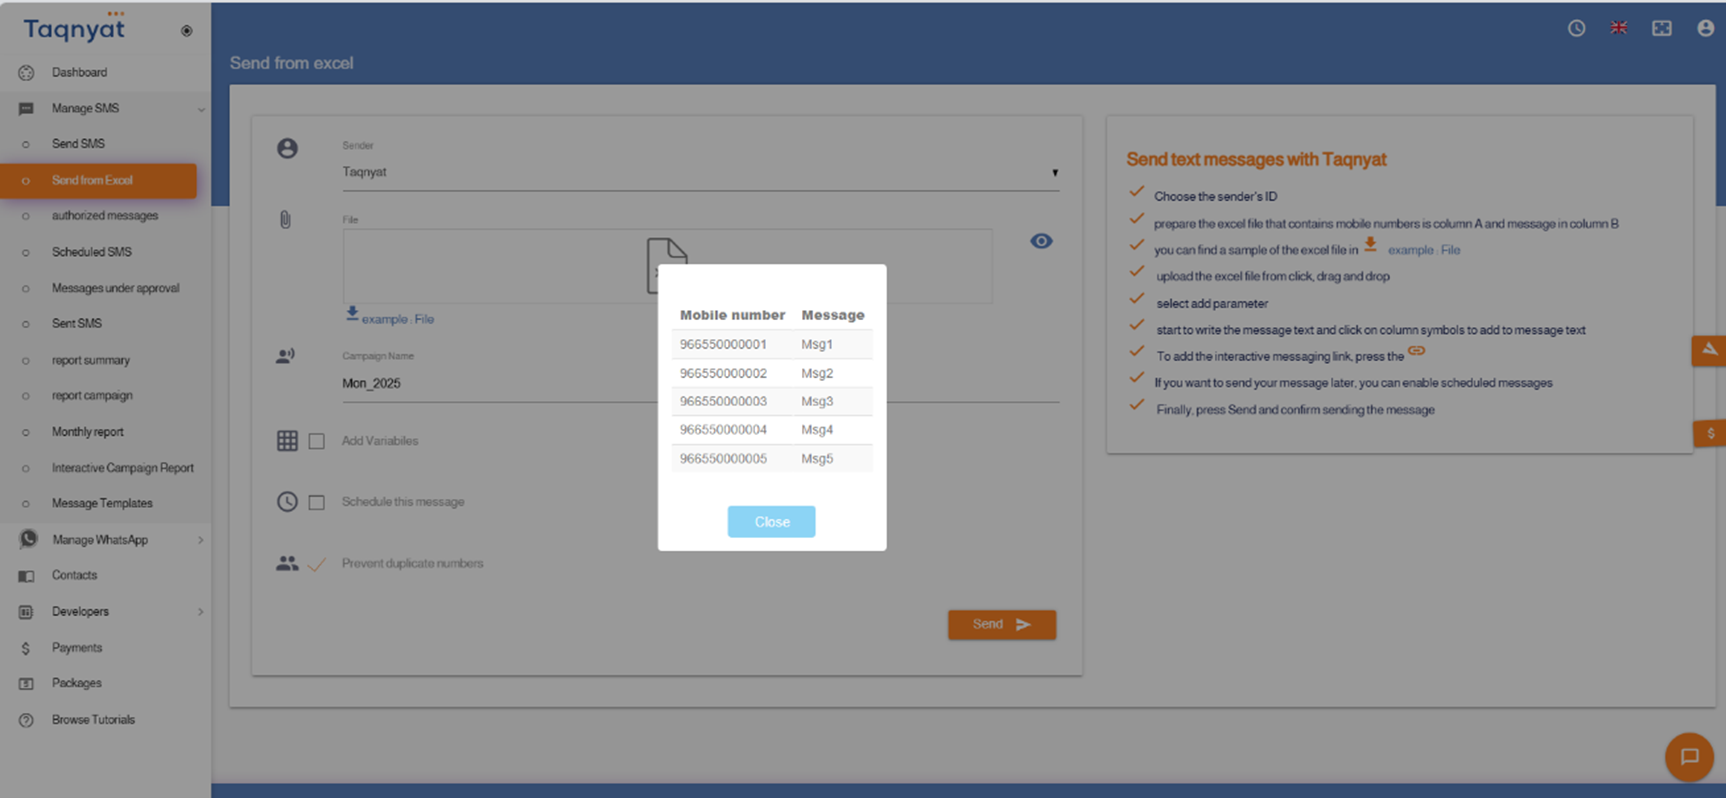
- Arrange the numbers in column A of the Excel file using the international format 966 without leading zeros
- Put the full message text in column B of the Excel file.
- Log in to your account via the link: https://portal.taqnyat.sa/
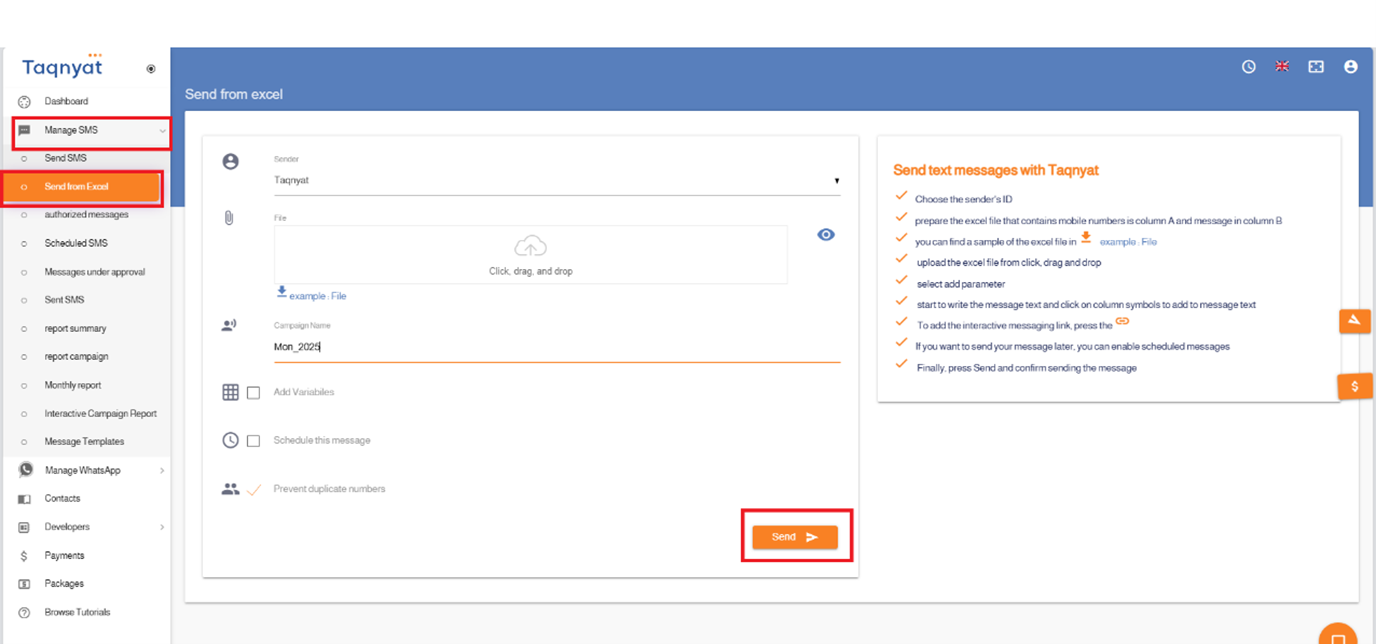
- Select "SMS Management."
- Choose "Send from Excel file."
- Select the sender name.
- Upload the Excel file.
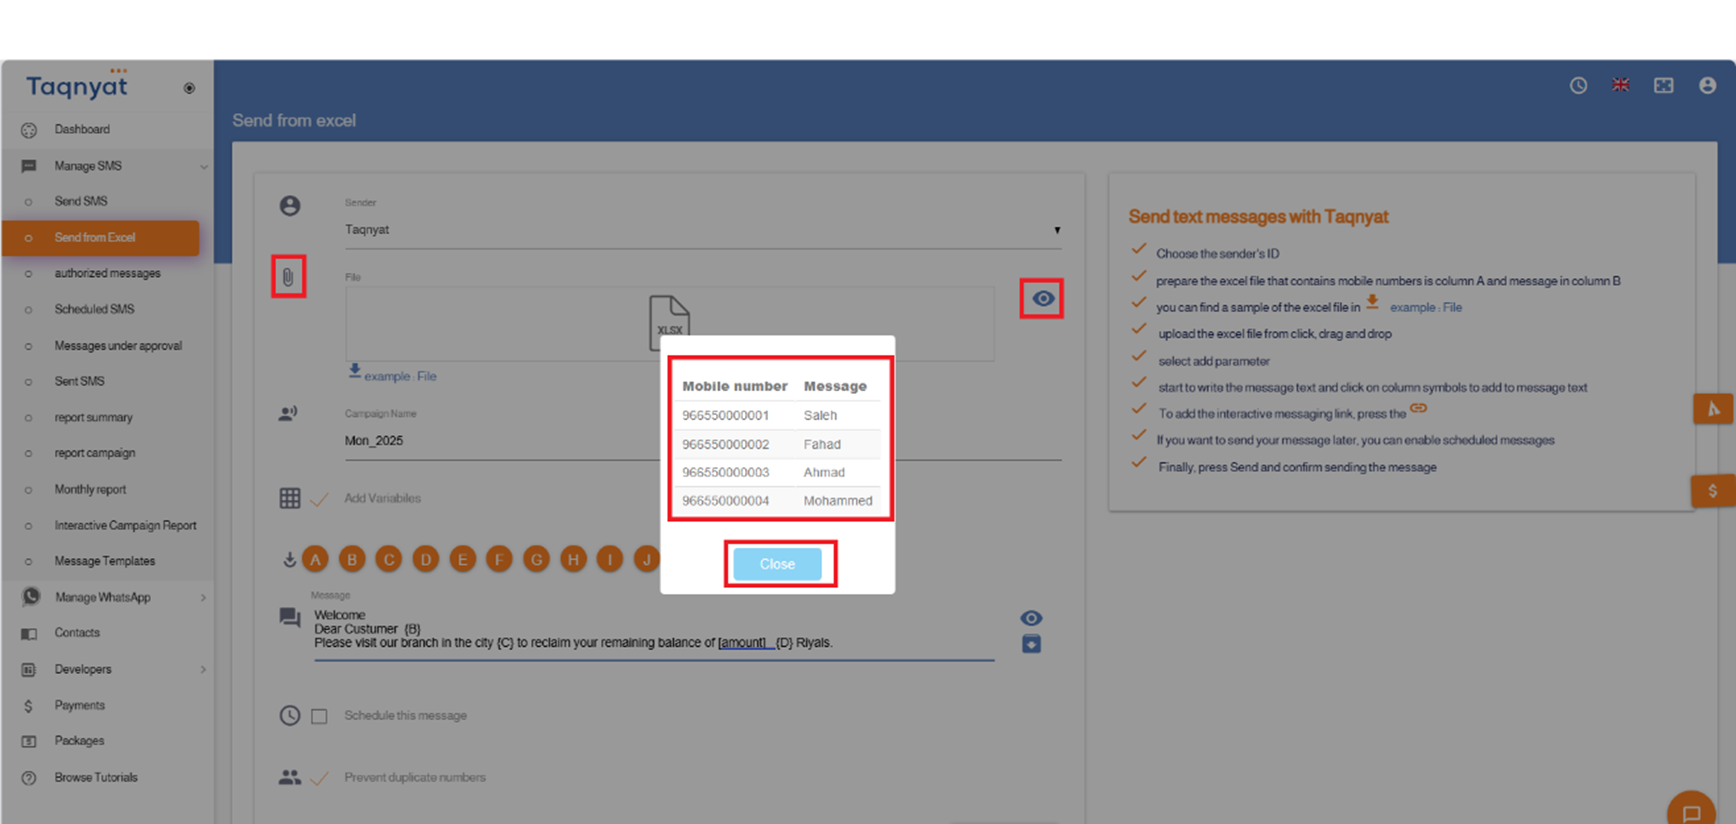
- You can preview the message before sending by clicking the eye icon to the left of the Excel file field.
- Click "Send."
- Verify the number of recipients and messages to be sent, then confirm the sending.
Reference Image:

Second: Numbers and variables in an Excel file
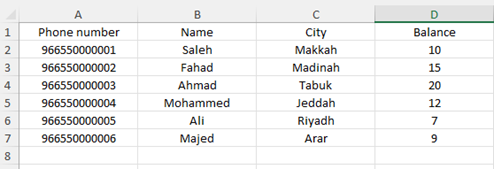
- Arrange the numbers in column A of the Excel file using the international format 966 without leading zeros
- Place the variables in the remaining columns of the Excel file, up to a maximum of 9 variables
- Log in to your account via the link: https://portal.taqnyat.sa/
- Select "SMS Management."
- Choose "Send from Excel file."
- Select the sender name
- Upload the Excel file
- Enable the "Add Variable" option.
- Start typing the message text.
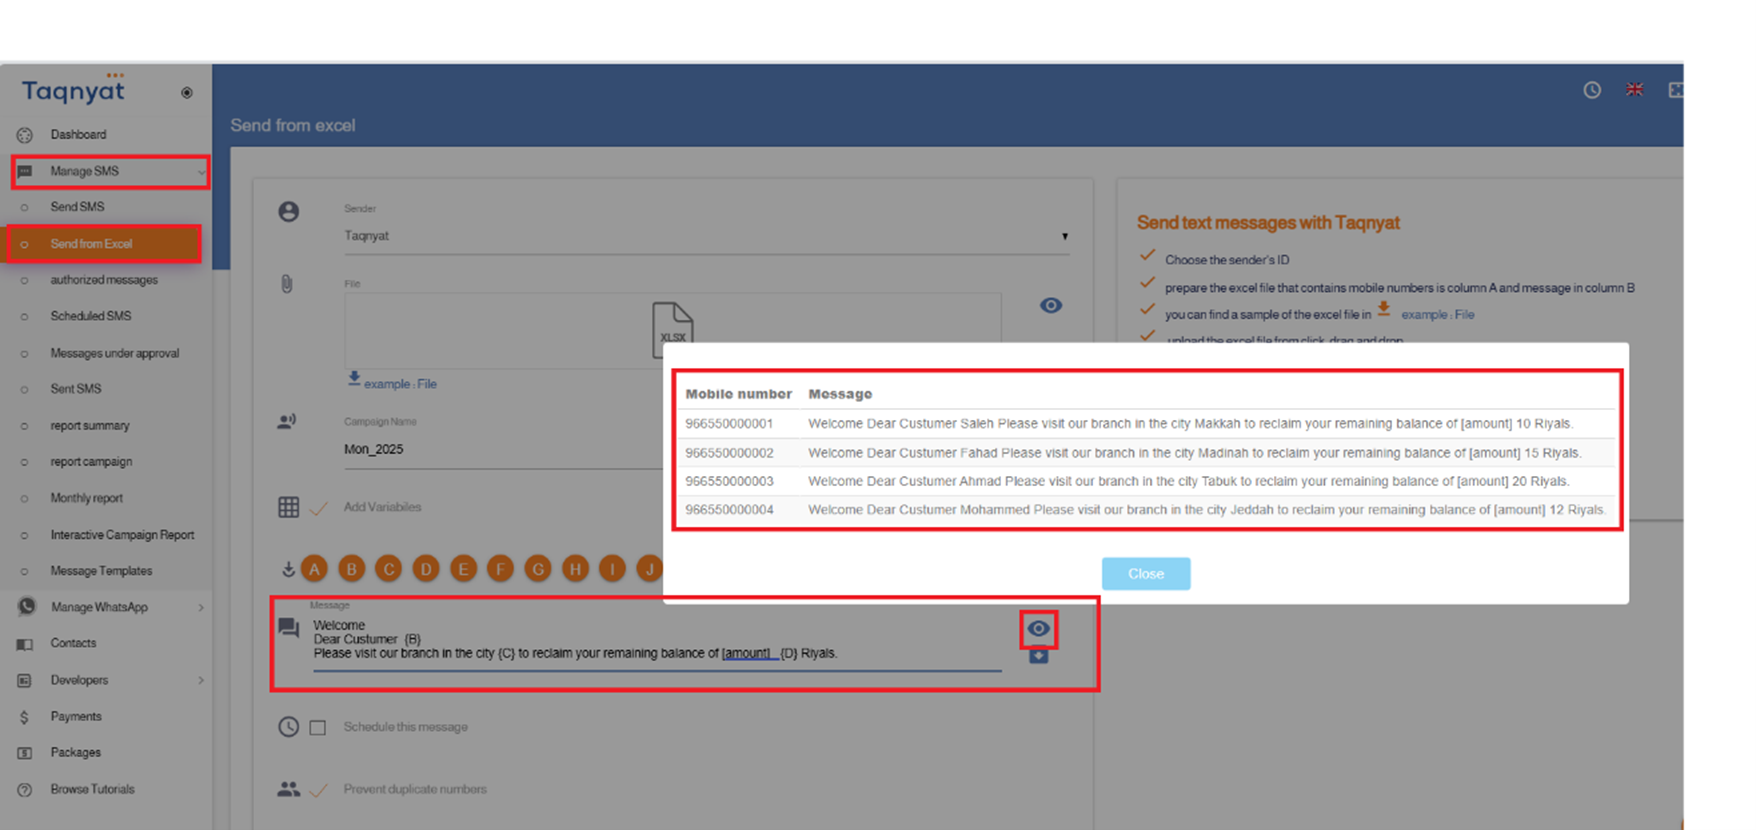
- Click the column icon whenever you want to insert a variable into the message text.
- You can preview the message before sending by clicking the eye icon located to the left of the message text field
- Click "Send."
- Verify the number of recipients and messages to be sent, then confirm the sending
Reference Image:
Message Timing
Message Timing Feature allows you to schedule a message to be sent at a later time.
Features of the Message Timing:
- Free of charge
- Ability to specify exact date and time for sending.
- Message credit is deducted at the scheduled time
- Option to repeat sending the same message daily, weekly, monthly, or yearly.
- Ability to schedule unlimited messages
- Ability to delete the scheduled message before sending time and recover the credit.
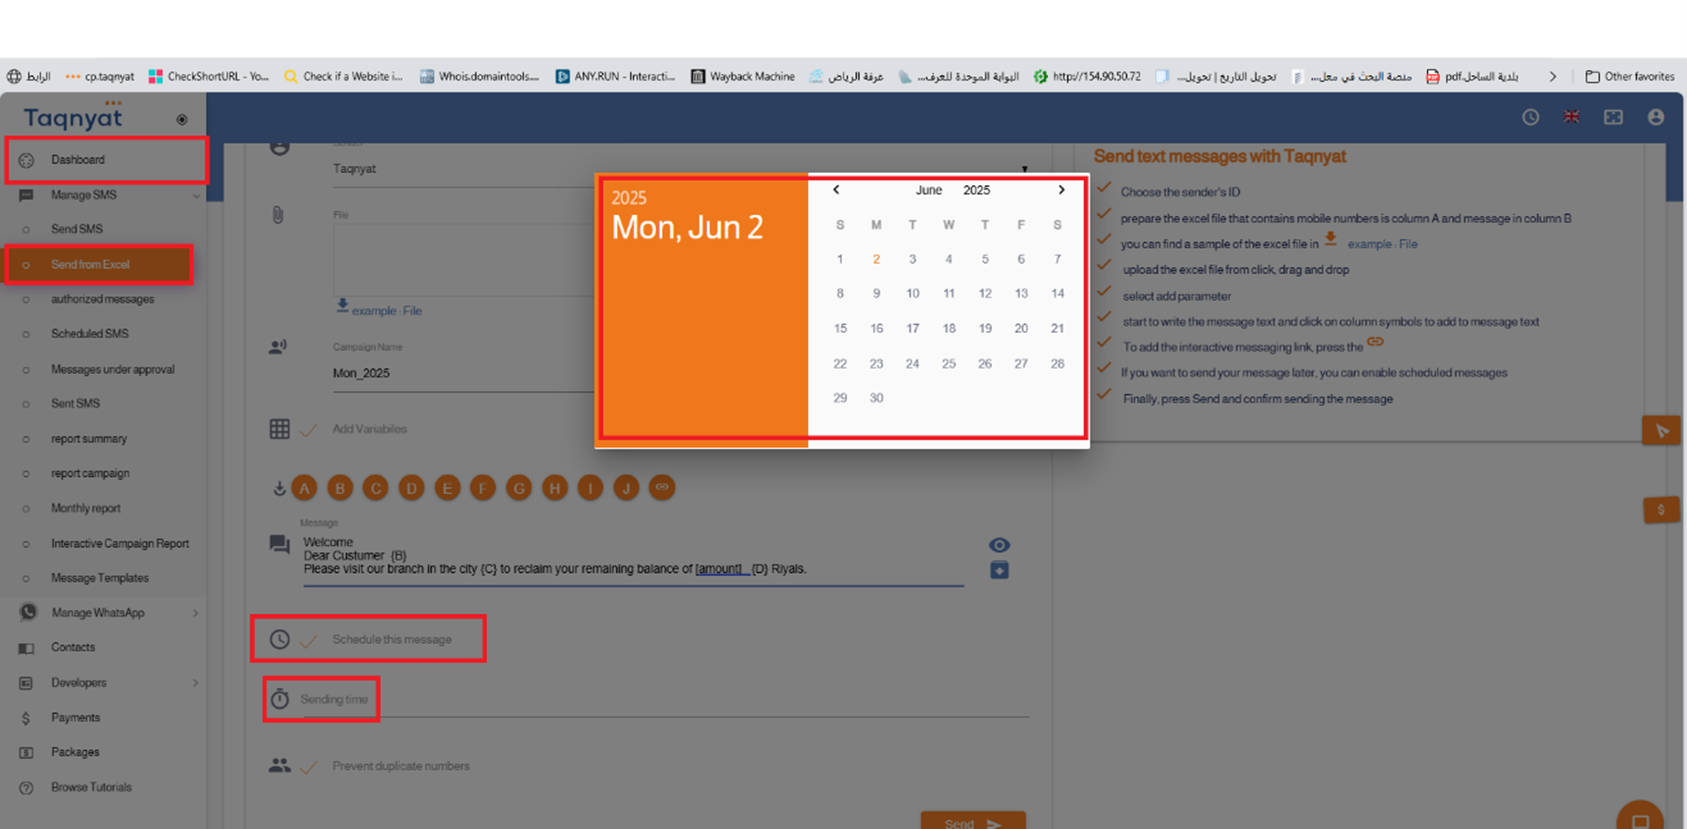
To activate the Message Timing feature, follow these steps:
- After preparing your message, enable the "Schedule this message" option
- Select the desired send date from the calendar.
- Select the desired send time from the clock.
- If you want to repeat sending, enable the repeat option and choose the number of repetitions.
Reference Image:
Scheduled Messages
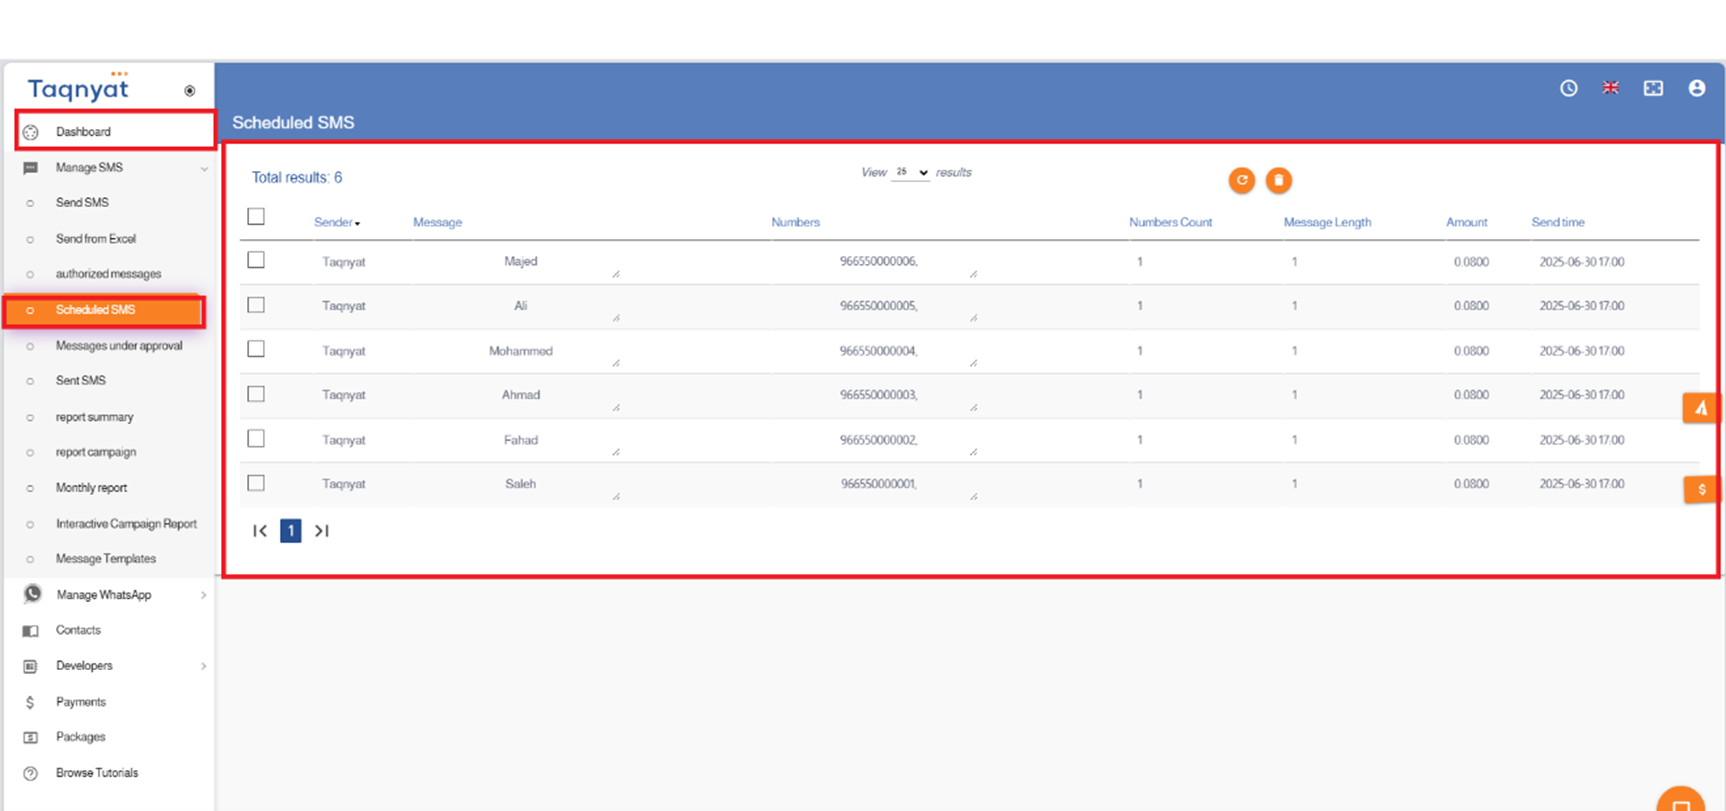
The Scheduled Messages List allows you to view and manage messages previously scheduled through your account. You can see full details about these messages and even delete them to recover their credit. To access the Scheduled Messages List, follow these steps:
- Select "SMS Management."
- Choose "Scheduled Messages."
Reference Image:
Message Character Count
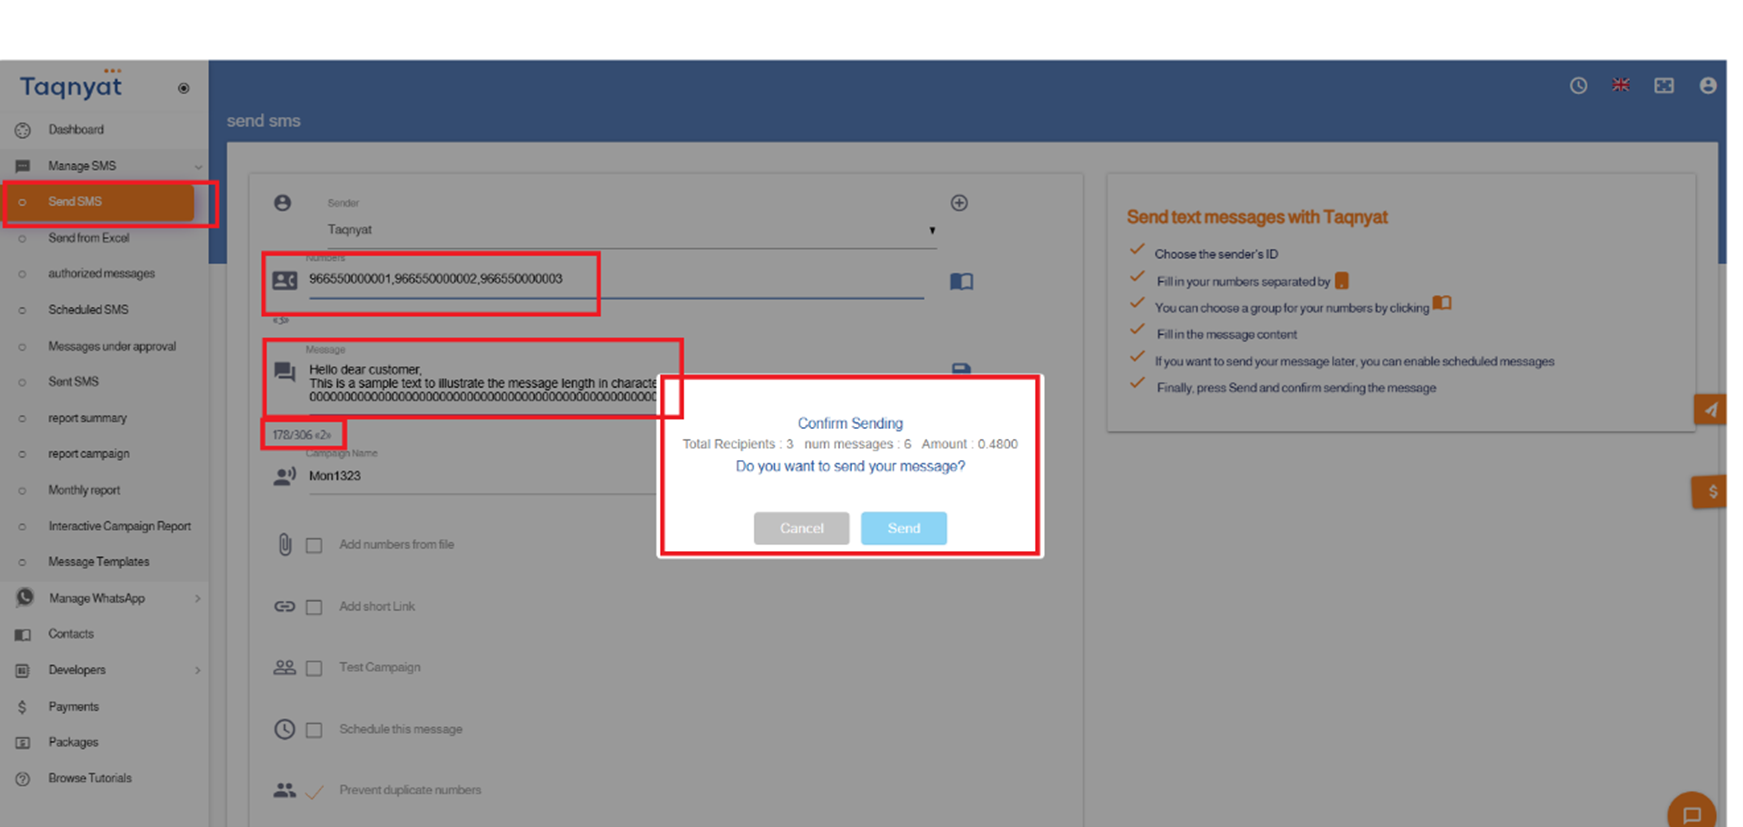
You can send Arabic messages up to 70 characters long. If the message exceeds this limit, every 67 characters will count as one message part.
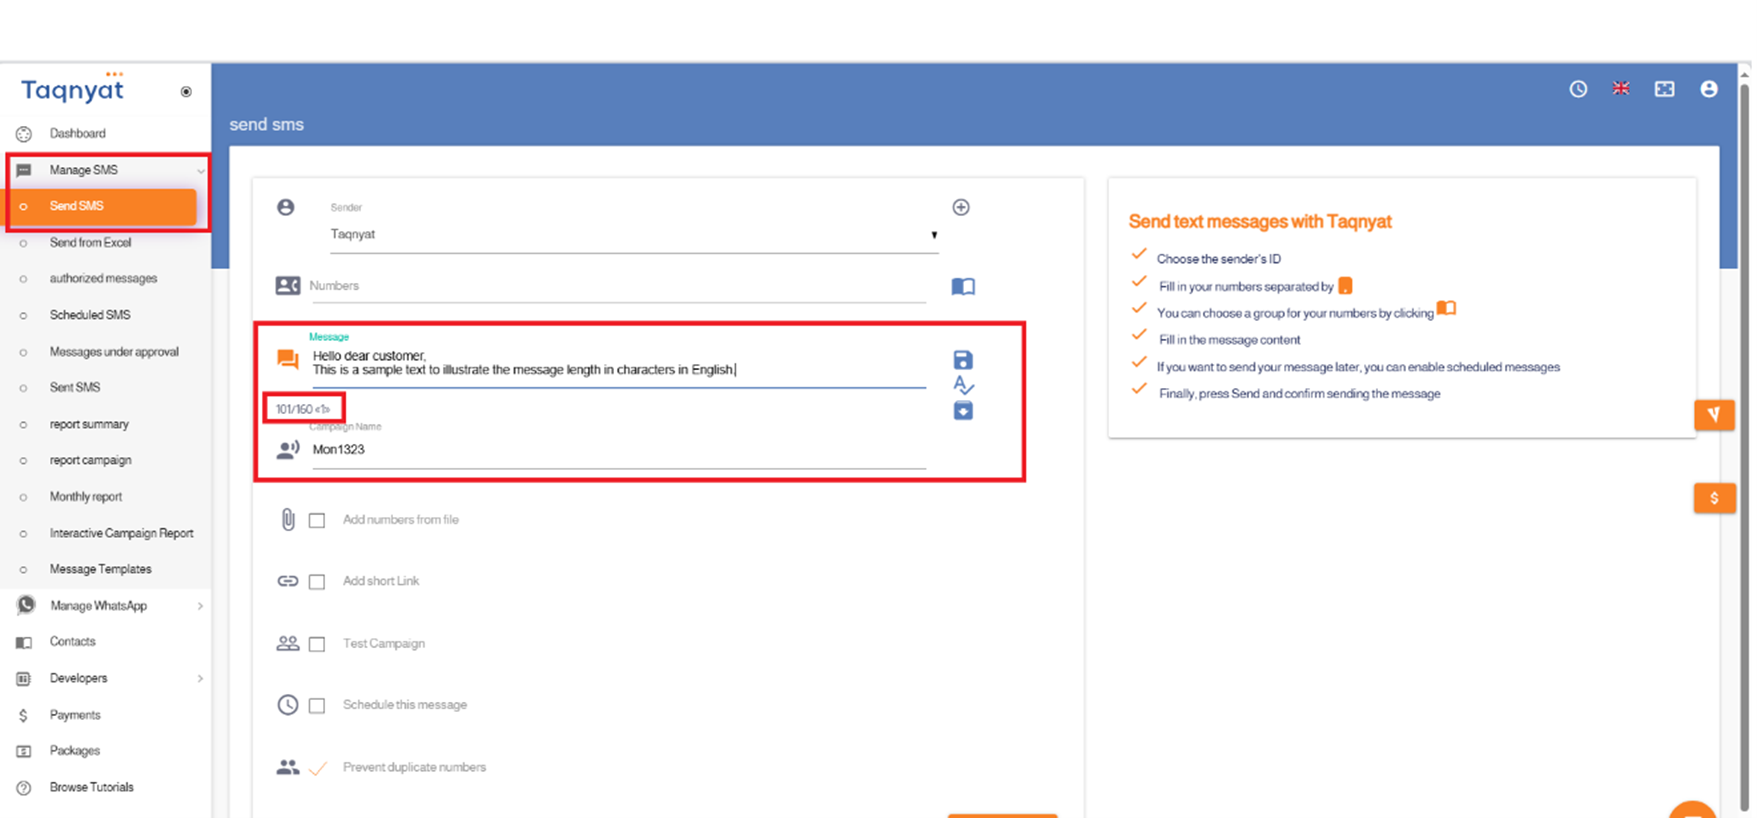
For English messages, a single message can be up to 160 characters. If exceeded, every 153 characters count as one message part.
We allow unlimited characters in messages but recommend not exceeding 10 message parts to ensure smooth delivery.
Note: The following count as characters:
- Spaces
- Symbols
- New lines
You can check message length before confirming send by:
- While typing, a character count and used message parts display below the text field.
- After confirming send, you will see how many message parts will be deducted from your balance, indicating the message length.
Reference Image:
Prevent Duplicate Numbers
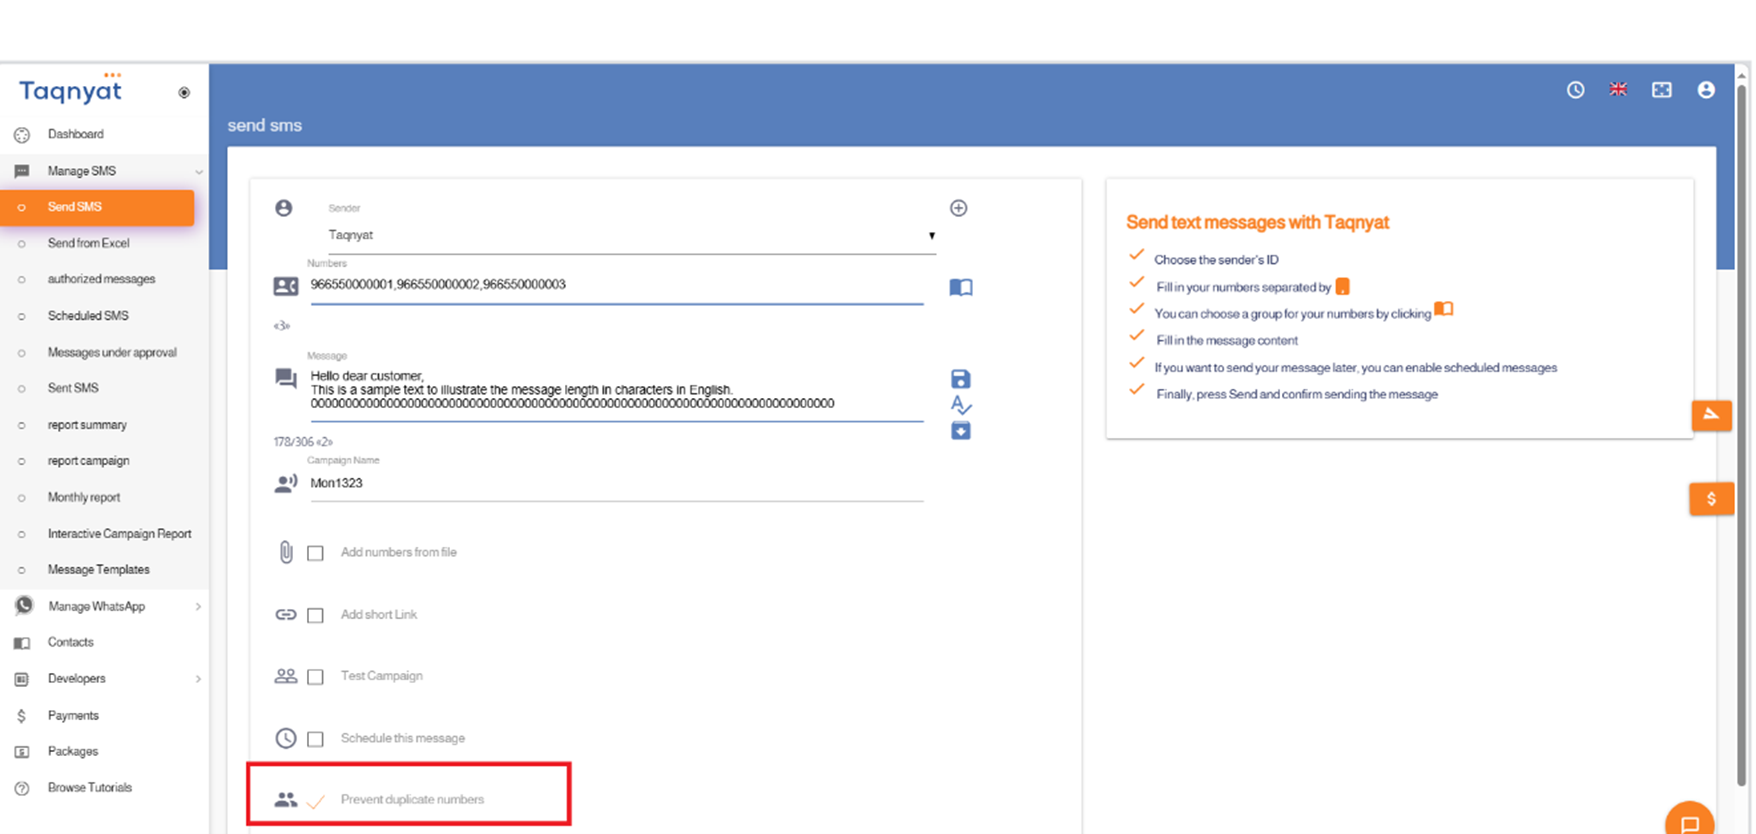
The "Prevent Duplicate Numbers" feature is automatically enabled to prevent sending more than one message to the same number by removing duplicate numbers before sending.
Feature benefits:
- Free of charge
- Automatically deletes duplicate numbers before sending.
- Option to disable it and allow sending messages to duplicate numbers
This feature is enabled by default in the system, but you can disable it if you wish to send messages to duplicate numbers.
Reference Image:
Message Templates
You can store a message text using the "Message Templates" feature, which allows you to resend it directly at any time without having to retype the message for each sending.
To save a message as a template, follow these steps:
- Log in to your account via the link https://portal.taqnyat.sa/
- Select "SMS Management"
- Choose "Send Messages"
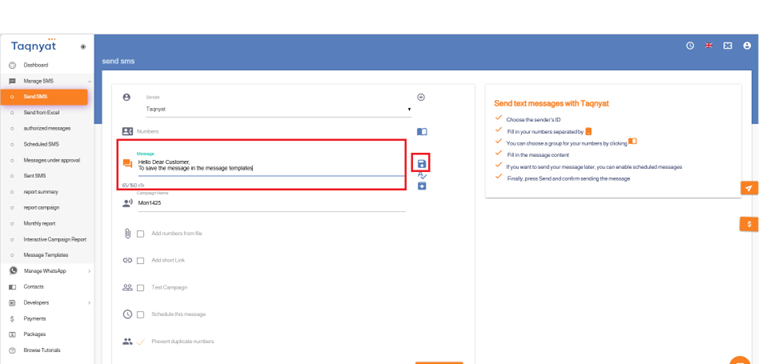
- Write the message in the message text field
- Click the "Save Message" icon located to the left of the message field
To send a message using a previously saved template:
- Select "SMS Management"
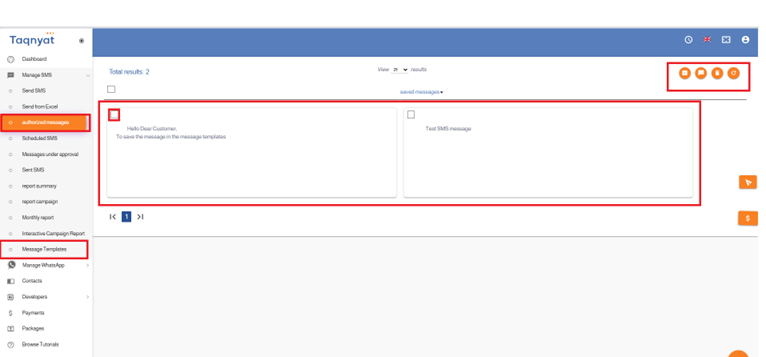
- Choose "Message Templates"
- Select the template you wish to send
- Click the "Send" icon to proceed with the message sending steps
Features of the Message Templates Service:
- Free of charge
- Unlimited number of stored texts
- No expiration date for stored templates
Reference Image:
Entering numbers when sending
Our site offers more than one method to enter the numbers you want to send messages to. You can check the details and explanations of all methods below:
First: Entering numbers manually
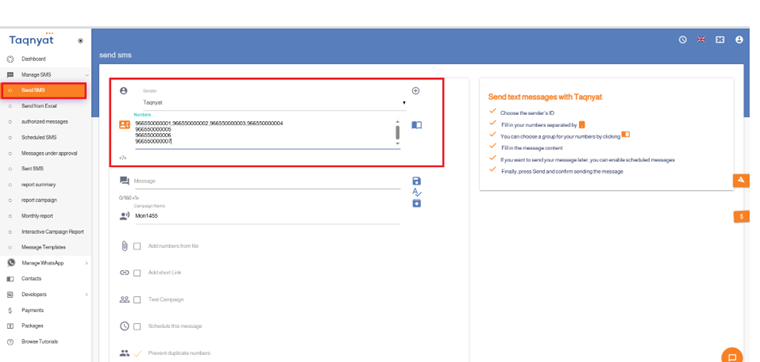
You can enter numbers manually in the numbers field in several ways:
- You can copy the numbers and then paste them into the numbers field.
- You can type the numbers manually directly into the numbers field.
Numbers must be formatted using one of the following methods:
- Vertically (one number per line).
- Horizontally with commas as separators.
Using these methods, you can add numbers belonging to the Kingdom of Saudi Arabia in either the international format or the local format.
Reference Image:
Second: Entering Numbers via File
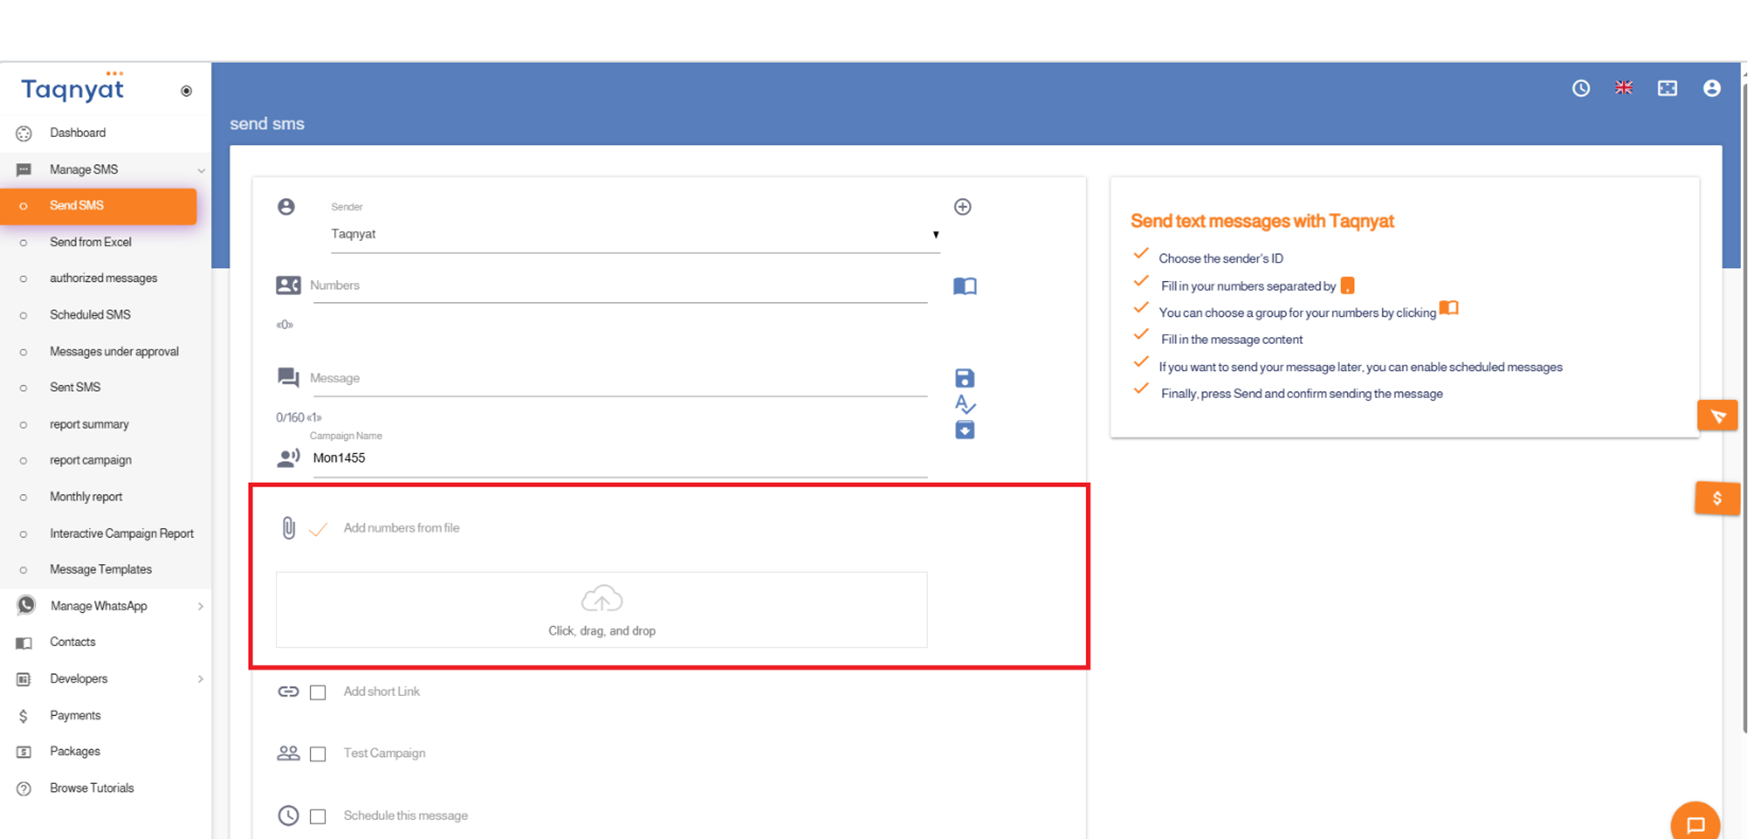
If you have a file of one of the following types: zip, txt, xlsx, csv containing the numbers in either local or international format, you can add it when sending messages by following these steps:
- Go to "Manage SMS".
- Select "Send Messages".
- Enable the option "Add numbers from file".
- Upload the file containing the numbers.
Important Notes:
- If the file is an Excel file, the numbers must be in column A.
- If the file is a txt file, the numbers should be formatted either vertically or horizontally, separated by commas
Reference Image:
Messages Pending Approval
Approval Pending Messages Feature allows the main account to control the messages sent from sub-accounts, requiring approval from the main account to complete the sending process of messages originating from sub-accounts.
Features of the "Approval Pending Messages" service:
- Free of charge: No additional fees apply.
- Messages from sub-accounts cannot be sent without prior approval from the main account.
- The main account can reject messages and specify the reason for rejection.
- Rejected messages can be edited and resubmitted for approval.
- Sub-accounts can delete messages that are pending approval.
- The main account can add approved templates that sub-accounts may send without requiring further approval.
- The main account receives notifications about messages pending approval.
Reference Image:
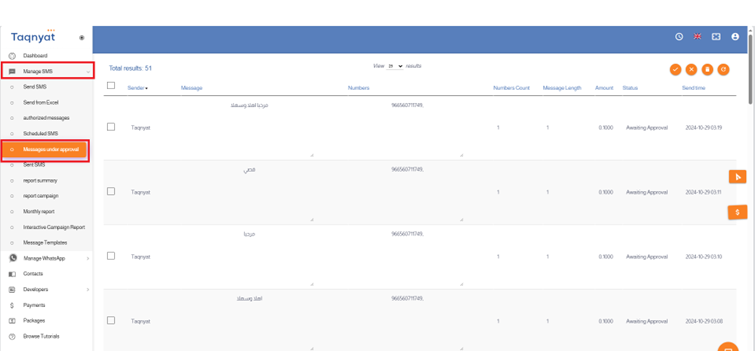
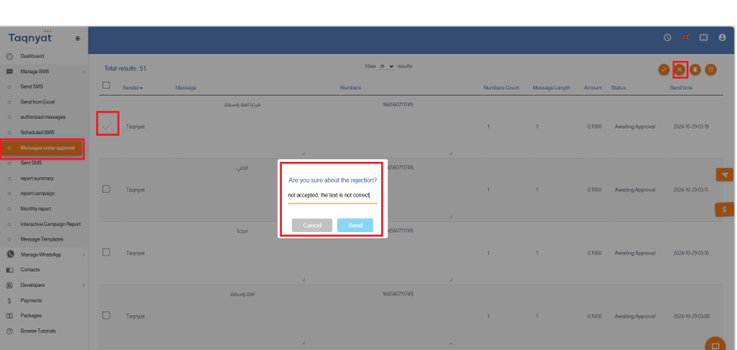
Authorized Messages are templates designated by the main account for sub-accounts. These messages can be sent directly from sub-accounts without requiring approval from the main account.
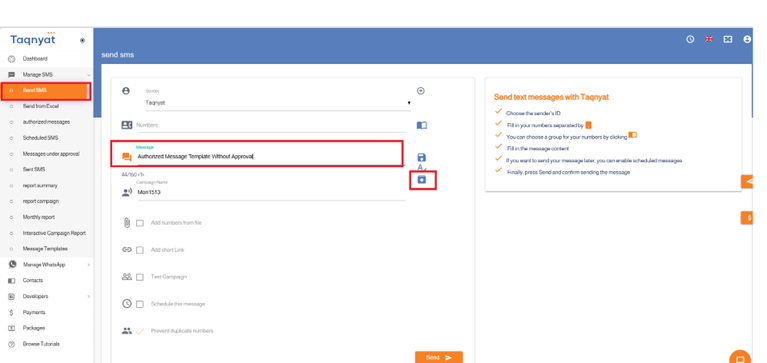
First: How to approve authorized messages through the main account:
- Log in to your account and select "Manage SMS Messages".
- Click on "Send Messages".
- Write the authorized message text in the "Message Text" field.
- Click the save icon located in the Authorized Messages section on the left side of the message text field.
Reference Image:
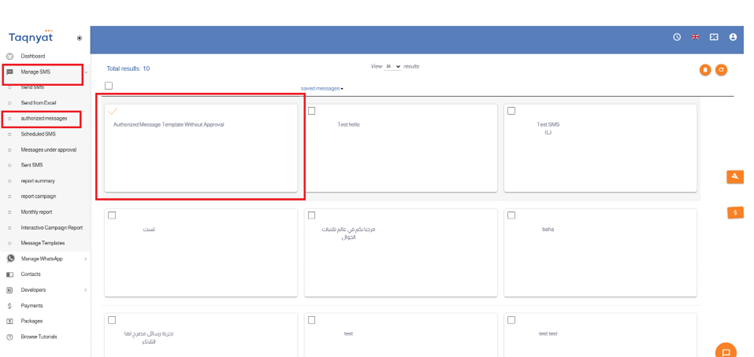
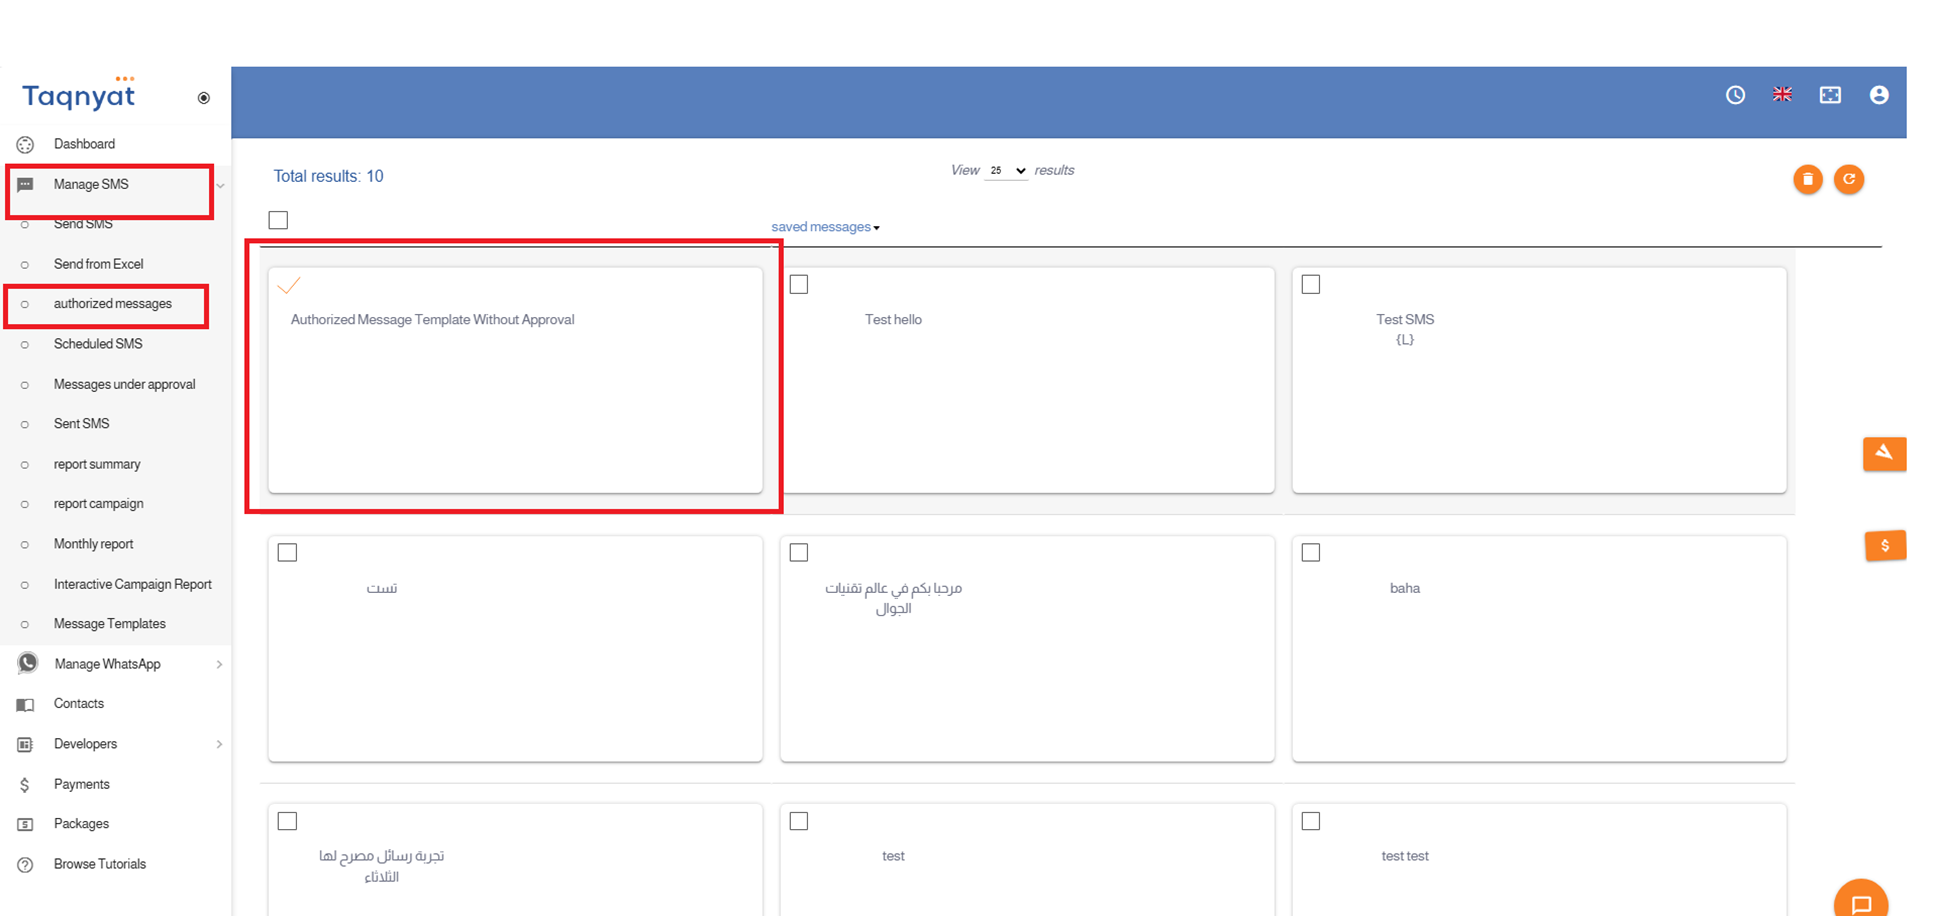
Second: How to Send an Authorized Message from the Sub-Account:
- Log in to your account and select "SMS Management".
- Click on "Authorized Messages".
- Select the message you wish to send.
- Click the Send icon to proceed to the message sending page.
- Complete the sending process.
Reference Image:
Please note that this service is not enabled by default and must be activated upon request through technical support.
